


You are using an out of date browser. It may not display this or other websites correctly.
You should upgrade or use an alternative browser.
You should upgrade or use an alternative browser.
Official 3D art thread - Warband
- Thread starter WeeSeng
- Start date
Users who are viewing this thread
Total: 3 (members: 0, guests: 3)


Turanien
Awesome work Austupaio!
theAthenian
??????Austupaio said:

For the dino mod riiiggghhhttt?????J12-19 said:Some stuff
Not to scale
Grunar
Grandmaster Knight

Austupaio said:Those are actually for a Minecraft-Dwarf Fortress project.
 Oh sweet !
Life_Erikson said:
That is a really good idea!
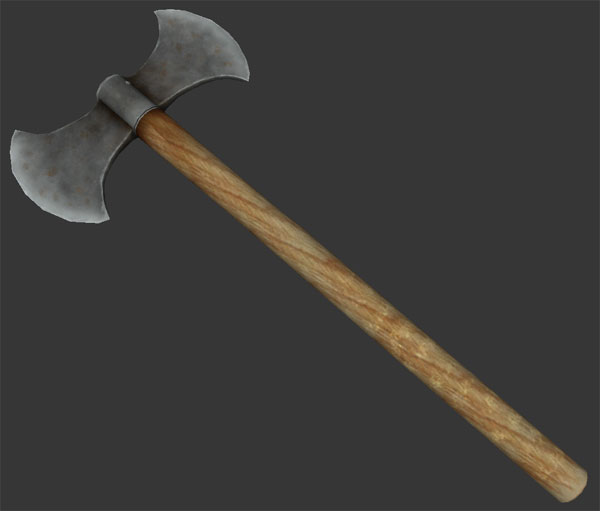
Mackie's axe, re-mapped and skinned. 512, painted in about an hour, speedpaint is fun
Here's the "Hollywood Templar". I've also done matching shield, horse, helmet and underwear (ok, maybe not that). This is a shameless reskin of Narf's excellent Transitional Plate.
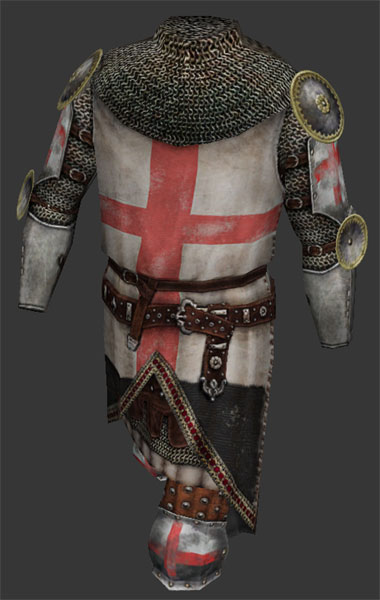
I hope Narf will forgive the ahistorical treatment, with my humble explanation. My players wanted some badass Templars to fight the Death Knights (my crummy but not copyright-infringing Chaos Warrior clones), but the way that armor's dealt with in the mod, I had to use an armor that Templars would never have worn (because it wasn't invented when they were still around, Dan Brown notwithstanding).
Since somebody asked via PM for pointers... here's my amazing speed-painting technique for metal (ok, it's not amazing, it's just fast, but whatever).
Here's the "Hollywood Templar". I've also done matching shield, horse, helmet and underwear (ok, maybe not that). This is a shameless reskin of Narf's excellent Transitional Plate.
I hope Narf will forgive the ahistorical treatment, with my humble explanation. My players wanted some badass Templars to fight the Death Knights (my crummy but not copyright-infringing Chaos Warrior clones), but the way that armor's dealt with in the mod, I had to use an armor that Templars would never have worn (because it wasn't invented when they were still around, Dan Brown notwithstanding).
Since somebody asked via PM for pointers... here's my amazing speed-painting technique for metal (ok, it's not amazing, it's just fast, but whatever).
Well, I may find time to write a tutorial, but here are the basics:
1. Get a good repeating metal texture, preferably without a lot of noisy scratches. There are lots of them on the web, and at least a couple of them have been posted here as OSP, IIRC. Bigger is better, as this is what you dump into a skin. Don't use "metal" that is just plain gray, btw. Real steels and irons have browns, blues and greens in them- it's faint but it's there.
2. Take the first version, and make a darker one by using pattern-stamp and a rusty texture, using Multiply, taking great care to make sure it still tiles well. You can use filters --> offset to keep it tiling well. This is the only "hard" part. The key here is to do it with light settings for flow, so that you don't overdo it- you want it to be deeper, darker, browner, but not black and not overly blotchy. Once you've made it, you never have to do it again, so take your time.
3. Make a lighter version, using Curves and maybe a bit of RGB color shift to add a bit more blue / green.
This is all you need, but feel free to make more variations. I have maybe 15 different metals I use, but most steel / iron is done with just 6-7 textures as the main palette- if I want to vary the final outcome, I do that via Curves / RGB channel changes at the very end- making grayish steel a bit green, a bit blue, or more gray (as in this case) is trivial.
Actual technique (this presumes that you have cut out your uvmap into a layer, for easy dumping and control over where you're painting- the guys who paint directly to one single layer give me the shudders).
1. Dump darkest version onto metal areas.
2. Paint with medium to brighten up areas that are worn and aren't occluded (that takes some practice, but it's not that hard once you've read about light occlusion), using a soft airbrush and low flow.
3. Paint with the brightest on areas that are really worn, same deal.
4. Do final edge work with a fairly bright blue for irons and steels, oranges and yellows for brasses, orange-reds for copper, etc., etc., using a drybrush brush and a reasonable flow, to add some fairly bright, blotchy highlights. Unless you really, really screw up... don't sweat it much. Or be conservative and use a second layer and clean up with eraser and a soft brush, if you are afraid of goofing up. So long as it's not going too deep into the skin, it'll be fine, though. The only trouble you'll find is fixing seam lines occasionally, but most of the time you just won't see 'em.
There are plenty of free brushes for Photoshop/Gimp for this stuff, but I use the one that came with Photoshop because that's what I learned with.
5. Do AO with a second layer, set to Multiply, using a rusty texture, again using multiply and an airbrush, to deeply darken the areas that are really occluded. In the case of the axe, I also had to do the area where the blade meets the metal of the handle with a simple cheater rectangle of black, pushed it to the right places, then applied a blur.
...that's pretty much it, honestly. Adding scratches and the like is just using the "toolkit" outlined above to provide you with consistent light / dark metals and keep your colors right. The rest of it's technique, and I'd have to show it to make it make sense. It's not hard technique, though- anybody with rudimentary mouse-painting skills can do it fairly easily.
Hira Shuriken, 64 polys (no spec map yet, so the render is too shiny).

Edit: tweaked the texture a bit.
Edit: tweaked the texture a bit.
Here's a WIP Kunai <200 polys.

Also, anyone got a few quick tips on spec mapping?
Also, anyone got a few quick tips on spec mapping?
This white material shouldn't shine too much. Make texture black&white and then have fun with brightness and contrast adding sometimes black brushes if u want to make non-shining place in ur object.
More white = more shine
More black = less shine
Everything. Good luck.
More white = more shine
More black = less shine
Everything. Good luck.
I should have been more specific. I know the basics; I wanted tips on creating the spec map most efficiently/easily/automatically.Make My Day said:This white material shouldn't shine too much. Make texture black&white and then have fun with brightness and contrast adding sometimes black brushes if u want to make non-shining place in ur object.
More white = more shine
More black = less shine
Everything. Good luck.
Desaturate the diffuse texture, black out any bits that should be matte and then just adjust the levels and material settings for your desired effect. If you want variation on specific model parts, the dodge burn tools are perfect for lightening or darkening parts of the spec map.MadocComadrin said:I should have been more specific. I know the basics; I wanted tips on creating the spec map most efficiently/easily/automatically.Make My Day said:This white material shouldn't shine too much. Make texture black&white and then have fun with brightness and contrast adding sometimes black brushes if u want to make non-shining place in ur object.
More white = more shine
More black = less shine
Everything. Good luck.
Lord_Cheap
Squire

I used the native weapons3 texture for this. A really basic sword.


Let me present you the newest addition to your collection of loots:
In-game pictures and others:


And the uv map:

Sorry about the plume, I'm still learning how to do them.
Edit: Forgot to add some bolts. Ill add em in right now. Ill drop the eye holes a bit.
The Cataphract Helmet
In-game pictures and others:
And the uv map:
Sorry about the plume, I'm still learning how to do them.
Edit: Forgot to add some bolts. Ill add em in right now. Ill drop the eye holes a bit.
Similar threads
- Replies
- 1
- Views
- 432