1. Introduction
- To elaborate on the subject of scening, I have to present my credentials first, so that you know I have knowledge regarding the very aspect of modding. Having started scening in the second half of 2019, I embarked on making new works for MP in Native with NeoGK, as SP in general and most MP modules were already in decline. As a result, there were not that many opportunities to lend my hand, thus I focused on the above. I created my works for my server and client-side module (Varena). My scenes are shared as LSP; they constitute my portfolio (https://forums.taleworlds.com/index.php?threads/lsp-scenes-veledentellas-scenes.447436/).
- Originally, having observed the declining activity of M&B engine titles modding scene, the lack of new users joining our little place and the popularity of the game across the whole spectrum of modules (it is at an all-time low), I decided to cancel writing this guide. However, I have resolved to fulfill my promise and deliver this work anyway, but not in its full shape, but with the basics trimmed down as everyone knows them. Most people already know the foundations, so it is more efficient to focus on lesser known things. I will gradually be releasing chapters of this guide pasted over from TW Modding Discord server, on which I initally wanted to exclusively share them.
2. Aims of this guide and general principles
There is a handful of sceners remaining, therefore I do not want to reiterate the most basic things, but focus on areas not or little covered anywhere else. Also, I must stress that learning comes best through practice, therefore I would like to instruct readers not to memorize things, but slowly and gradually implement the knowledge into their practice. Hopefully, the audience will get to learn new things much sooner with the guide.
Also, some basic principles must be highlighted regarding project/ time management. If one makes a project of something (in this case a scene) with its features, the process of creation will take much less time and resources on average than when making the thing live. Knowledge what to do beforehand pays off, therefore you may efficiently cooperate with your team to create something worthwhile.
Watch the remaining 30 seconds of the video below in which Steve Jobs introduces iPhone in 2007.
'People who care about software should make their own hardware too' - paraphrasing, people who care about scening should take care of modding too as they will have full control of their tools. They will also be able to project new creative innovations and know what to expect with their tools (it is not always possible like with Native). Scening is closely tied to modding; a scener gets what modders made.
3. Importance of holistic modding
Scening is only an aspect of modding, therefore to be fully proficient in it, one must learn other facets as well. Of course it is not essential and fully needed, but nonetheless it is inextricably tied to modders' work. Therefore, if working with others, it is nice to know how to communicate with them, for example, to tell that a scene prop's scripted feature is broken. I advise the readers to download the MS of Native WB to take a look at its files. Also, I recommend to read or skim through basic tutorials on modding to get a gist of it. There are many types of files which are responsible for many things, such as:
- items, governing all items found in-game, such as headwear, armor, weapons, edible goods and commodities, evern horses
- scene props, governing all structures/ objects/ miscellaneous items that are useful in particular when making scenes; they encompass buildings, small objects and even particle systems such as waves or fire
- scenes, governing entries of our beloved scenes read by the engine
- strings, governing entries of our beloved scenes' names (for MP)
- and others...
4. Glossary of terms, acronyms and abbreviations
- WB - Warband, the main game of M&B engine which still is the most popular title from the franchise
- WFaS - With Fire and Sword, a DLC-like module released as a standalone game
- M&B - Mount & Blade, the game that kickstarted the franchise
- NW and VC - Napoleonic Wars and Viking Conquest, respectively; the only DLCs of WB
- MP - multi-player mode
- SP - single-player mode
- TW - TaleWorlds Entertainment, the developer of M&B engine and its games
- AI - Artificial Intelligence; means non-player entities, such as agents, parties and so forth
- MS - Module System, a set of files needed to compile a modification; it contains all vital elements of a pre-compiled modification
- Mod - either modification of a game or module
- HEX - hexadecimal format with "0x" prefix; HEX values are compiled to DEC values by the MS
- DEC - decimal format, as is
- Hardcoded <thing> - something which is not subject to change by a user in the MS
- X - first dimension
- Y - second dimension
- Z - third dimension
- RMB - right mouse button
- LMB - left mouse button
- MMB - middle mouse button (wheel)
5. Distinction between scenes and maps, troops and agents and related terminology
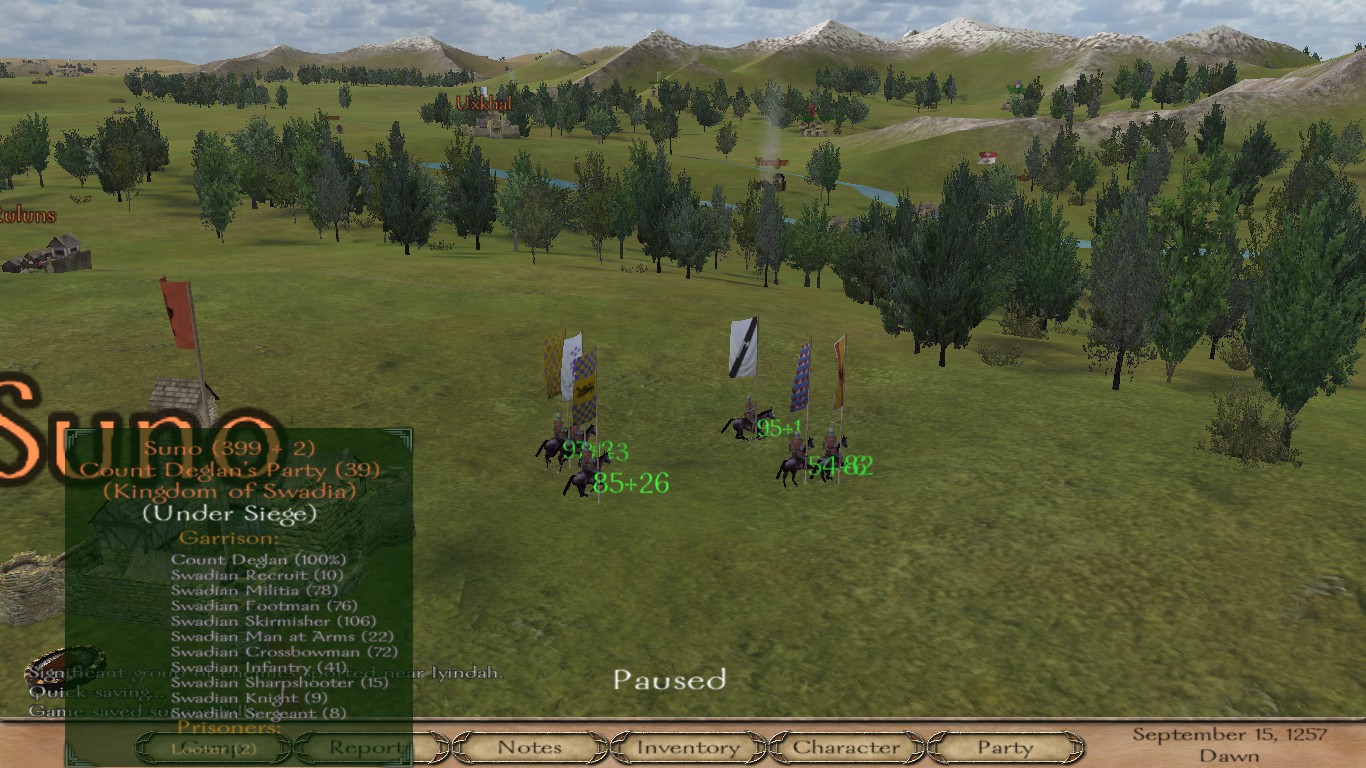
Parties are SP-exclusive units found on the world map; they range from animate ones (warbands of looters/ lords/ kings and so on) to static ones (yes, villages/ towns/ castles are parties too).
"Scenes" and "maps" should not be used interchangeably. In the world of modding, maps are solely world maps in SP mods, whereas scenes are what we care about; in short they are a realm where characters meet, fight, exchange dialogues and so on. Maps are exclusive to SP as they are a polygon mesh on which parties interact with each other; scenes, however, are present in both SP and MP since they are central to user experience. When talking to non-modder laypeople, call "scenes" as "maps", but when talking to modders, you must call "scenes" with the proper name.
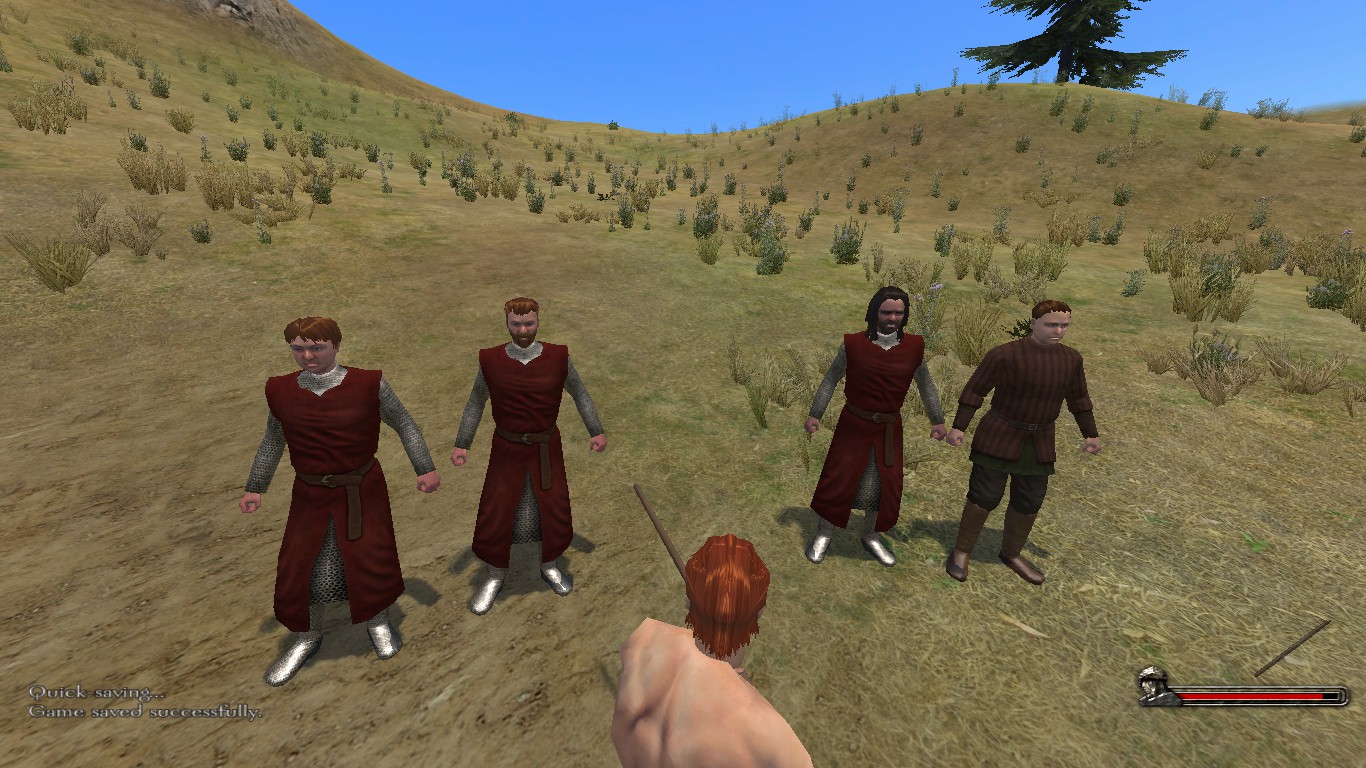
Troops are pre-defined types of characters declared in one of the MS's files. They range from lords, kings, village elders, ordinary soldiers, MP warriors and so on. SP maps do not have agents, they have troops which are stored in parties. Agents are characters only present in scenes; they can be many instances of the same troop, such as AI MP Swadian Men-at-Arms.
Missions are a scripted context governing what happens in them such as, for example, bandit raids, village battles, sieges, battles, MP gamemodes and even weddings. They vary in themselves and have different features.
Rhodok lord parties withdraw from Suno, which is a party as well and comprises of another party; all happens on a world map. For instance, Count Deglan's party and Suno's garrison has 78 Swadian Militia troops; if some of them die during a siege, the game will calculate the casualties and remove them from the party. Troops are spawned as agents in a scene in a mission.
3 agents of one troop (Swadian Man-at-Arms) and 1 agent of another troop (Swadian Crossbowman) spawned in a training mission in a training field scene.
6. Scene entries (pre-compiled and compiled)
There are two crucial elements of a scene - a scene entry and an .sco file (unless a scene is unmodified/ autogenerated). For MP scenes, a string entry and a script entry are also essential. Let's now take a look at module_scenes.py file of the MS.
("multi_arena_v_welcome_to_varena",sf_indoors|sf_no_horses, "arabian_interior_keep_b", "bo_arabian_interior_keep_b", (-100,-100),(100,100),-100,"0",
[],[],"0"),
- The purple part is the scene's name which must match the .sco file's name with prefix "scn_" that is added to it upon compilation.
- The blue part is comprised of scene flags that set a hardcoded parameter.
- The yellow part is only applicable to indoor scenes. It is a name of the mesh used for an indoor scenes (outdoor ones use "none" instead). Use OpenBRF to browse through available indoor meshes (see chapter: Third-party programs in particular useful when it comes to scening).
- The orange part is a name of the collision mesh tied to the regular mesh (see above; outdoor ones use "none" instead). The "bo_" prefix is added to the regular mesh.
- The dark pink part are minimum and maximum coordinates of a scene, respectively (format: X, Y). Agents cannot move and AI Mesh does not generate beyond them. They draw a square and its edges are special barriers that prevent agents from crossing them and activate disappearance of routed agents once they have touched them. Also, terrain is automatically elevated behind them to make a seamless transition with the outer terrain.
- The light green part is water level (better to be set at -100 for most scenes).
- The light blue part is HEX terrain code which can be obtained in Terrain Edit Mode or in Terrain Generator by Swyter (see chapter: Third-party programs in particular useful when it comes to scening). Indoor scenes should have it at "0".
- The two square brackets do not matter anymore in WB, but they used to in M&B.
- The slate part is outer terrain. Use OpenBRF to browse through available outer terrains (see chapter: Third-party programs in particular useful when it comes to scening).
Python:
sf_indoors           = 0x00000001 #DEC 1    #"The scene shouldn't have a skybox and lighting by sun" #a must-have for indoor scenes
sf_force_skybox      = 0x00000002 #DEC 2    #"Force adding a skybox even if indoors flag is set" #self-explanatory
sf_generate          = 0x00000100 #DEC 256  #"Generate terrain by terrain-generator" #a must-have for outdoor scenes, generates terrain mesh from its HEX code, although it does not have to be used in them if one wants to have no terrain and use only props and their collision meshes
sf_randomize         = 0x00000200 #DEC 512  #"Randomize terrain generator key" #self-explanatory, may be used for randomized scenes for MP
sf_auto_entry_points = 0x00000400 #DEC 1024 #"Automatically create entry points" #self-explanatory, may be used for randomized scenes for MP
sf_no_horses         = 0x00000800 #DEC 2048 #"Horses are not available" #disables horses in a scene, works both in SP and MP
sf_muddy_water = 0x00001000 #DEC 4096 #"Changes the shader of the river mesh" #makes water opaque and dark, may be used with shallow terrain with pitfalls to obscure themNow, let's examine the compiled form of the same entry. Can you see the format and transition from pre-compiled to compiled format?
Python:
scn_multi_arena_v_welcome_to_varena multi_arena_v_welcome_to_varena 2049 arabian_interior_keep_b bo_arabian_interior_keep_b -100.000000 -100.000000 100.000000 100.000000 -100.000000 0
  0
  0
 0
scn_multi_arena_v_welcome_to_varena has been added, it should be the .sco file's name. 2049 is an effect of adding the flags' DEC values to themselves (2048+1). The rest can be understood with no hassle. With knowledge how compiling works with scene entries, you will be able to decompile them from raw scenes.txt format.6. String entries (pre-compiled and compiled)
Strings are needed for MP-only scenes to display a scene's name on a server.
("multi_arena_v_welcome_to_varena", "Welcome to Varena by Veledentella"), is a pre-compiled form comprising of the scene's name without "scn_" prefix and the string without underscore spaces ("_"). str_multi_arena_v_welcome_to_varena Welcome_to_Varena_by_Veledentella is a compiled form with added "str_" prefix to the scene's name without "scn_" prefix and the string with underscore spaces ("_"). With knowledge how compiling works with string entries, you will be able to decompile them from raw strings.txt format (it is easy though).6. Script entries (pre-compiled only)
Script entries are needed for MP-only scenes to make a scene be selectable in MP panel under a mission such as Siege, Deathmatch, Duel and so on. The responsible script is named
multiplayer_fill_map_game_types. Let's examine the snippet (troop_set_slot, "trp_multiplayer_data", multi_data_maps_for_game_type_begin + x, "scn_multi_arena_v_welcome_to_varena"),. Mostly one copies over it from another entry and adjust the 'x" value, depending if the scene succeeds another. The scene's name must be prefixed with "scn_".6. SceneObj file format
SceneObj files are ones with .sco extension. They contain:
- modifications to terrain, as set in HEX terrain code (not absolute values of each polygon to save space)
- texture and ground color paint
- AI Mesh faces (they do not increase the file size if they have not been modified at all and are thus tied to polygons)
- objects in a scene; each entry contains:
- group value for flora
- type index (some in-depth thing)
- name of objects, such as
spr_mine_a("spr_" is a prefix for scene props and "itm_" is a one for items; flora instances have none) - position (X,Y,Z)
- rotation (X,Y,Z)
- scale (X,Y,Z)
- variable numbers 1 and 2 (they range from 0 to 127 as 128 is the total number of them coded in ASCII 7-bit)
7. Setting up and grasping Edit Mode
Fire up the launcher of your desired game and click "Configure". Choose "Enable Edit Mode", alternatively "Disable Sound/ Music" if you want to listen to some music while scening and "Start Windowed" to get to see the panel and access new features. You may leave the last feature disabled and use a shortcut <mostly left> Alt + Enter to leave/ enter Windowed Mode as well.
- Terrain Edit Mode can be accessed when on a world map in the bottom panel in lower left corner. It contains a terrain preview window and panel with parameters. Use LMB to zoom in/ out and RMB to rotate the preview terrain mesh. The principle of making a terrain code is that it should resemble the desired scene as closely as possible (for example, if one wants to make a mountaineous desert scene, they cannot generate a flat grassy one, so that space is conserved). There are buttons/ sliders/ boxes to:
- copy/ paste the HEX code (useful for readjusting HEX terrain codes from already-made scenes, amongst other uses)
- place river in the scene (it will automatically be surrounded with/ have pebble texture applied; be careful because it may give water an effect of flowing water and weird shadows, which is mostly undesired)
- enable deep water which deepens the river
- enable shade occlusion (unclear, should be left alone)
- disable grass (sometimes desired since grass cannot be otherwise removed as it spawns everywhere and not every player has the option to see it enabled)
- set polygon size value (has its impact on performance and file size of a scene with applied AI Mesh, the larger the value; however, lower values give more control of terrain modification, as terrain mesh faces are smaller)
- set terrain type (used to generate location-based scenes)
- set the amount of vegetation (flora instances cannot be removed in Scene Edit Mode, so be careful with this setting, although it can be reverted later [see the first subpoint of Terrain Edit Mode])
- set the magnitude of ruggedness (flatness of the terrain mesh and height of its faces combined in a fusion)
- set the magnitude of slope/ inclination (in other words, labelled by TW as "valley")
- set the range of hill height
- set X, Y size to a hardcoded limit (can be circumvented with Terrain Generator by Swyter [see chapter: Third-party programs in particular useful when it comes to scening])
- set flora/ river/ terrain seeds and randomize them
- Then, enter a scene (either in MP or SP) and use a shortcut Ctrl + E to access/ leave Scene Edit Mode (be careful to frequently leave/ reenter it to save changes in case the engine crashes; also, avoid misclicking on discarding changes). It is recommended to spawn an agent and move it as close to the area you want to change, so that the camera will be centered on him/ her when entering Edit Mode.
- Controls are:
- LMB - rotates the camera
- Ctrl + S - slows down object movements and speeds up the camera movements; also makes the experience more smooth
- H - hides the User Interface elements, locks the ability to make some changes and does some visible stuff such as rendering water
- RMB - selects things
- Ctrl + RMB - selects multiple things either in a scene or in the object list
- double LMB click on an object from the list: selects the clicked object and moves the camera towards it (guaranteed to crash the game sooner or later)
- A, S, D, W - moves the camera, can be double and triple clicked to speed up the process
- MMB - clears color/ terrain/ texture in respective mode
- C, E - increases/ decreases the height of the camera
- G - while pressed, mouse movements move the selected object(s) parallel to the ground
- T - while pressed, mouse movements increase/ decrease the height of the selected object(s)
- X, Y, Z - while pressed, mouse movements rotate the selected object(s) with respect to the object(s)' X, Y, Z axis
- U - while pressed, mouse movements rotate the selected object(s) with respect to the Z axis of the world
- R - resets the selected object's rotation
- Shift + R - sets a point of reference related to rotation, so that any future usage of 'R' will reset the object's rotation set with 'Shift + R'
- B - scale selected object
- B + X - scale selected object along X axis
- B + Y - scale selected object along Y axis
- B + Z - scale selected object along Z axis
- Alt + B - resets the selected object's scale
- Delete - deletes selected object(s)
- Space - enables add object mode
- Double LMB clicking on an item from add object list makes it spawn at the camera position
- F10 - freezes the mission
- using a keyboard key when in the add object list will scroll to the object starting with the letter (useful for quick navigation [think of pressing 'D + Y' to access dungeon_water_drops just above dye_blue to avoid 'D + U' as there are many dungeon_ props])
- The panel contains three similar windows:
- Ground Texture Paint that contains a dropdown menu with texture types (transparent or reflecting surfaces on texture paint edges can be removed by choosing the previous texture type and painting it over the terrain with the same texture)
- Ground Color Paint that contains sliders with color preview boxes (if you cannot see them with a low-resolution screen, try using one with higher resolution or work it around with another desktop screen)
- Ground Elevate that contains options to increase/ decrease/ smoothen/ level the terrain (0 does not work, but values such as -0.1 work)
- These three windows have in common:
- Radius, which is a subject related to geometry of circles or spheres; its related formula is area = π*r². If, for instance, radius is 10, the area covered will be 314 units². But, with radius 20, the area covered will not be 614, but 1256 units²
- Weight defining how strong the effect will be
- Hardness defining what portion of a polygon(s) will be affected
- AI Mesh has its own chapter
- Edit Weather with its ambient lighting/ lighting/ sun elevation/ PostFX/ other values, which are of lesser significance (if you cannot see them with a low-resolution screen, try using one with higher resolution or work it around with another desktop screen). Weather in vanilla WB does not work, in contrary to WFaS which stores persistent weather settings in .sco file (see WFaS source code for reference). Shadows are a complex modding subject - they are cast by props, but ones intended to be moveable (such as doors) with
sokf_moveableflag do not cast shadows at all. There is a flagsokf_enforce_shadowsto enforce them. Props' collision meshes are used to calculate shadows; some materials also can be set to cast no shadow. There is also an operation to recalculate shadow of props, but it is another tale of scripting. Skyboxes are defined somewhere else just as flora and they affect lighting and shadows alike - Edit Objects has panels for/ features of:
- selected object's name box
- boxes for variable values 1/ 2
- highlighted selected objects with their names in the pop-up window in the main window
- there is no rotation in the panel, one has to adjust it oneself (.sco filetype contains rotation) manually in the main window
- scale boxes with an option to invert the values
- position boxes
- list of objects (navigation with a letter key does not work in it), beware of crashes whose culprit is mentioned above
- boxes to enable/ disable randomization of rotation/ scale
- box to add an object
- list of objects to be placed
- There are five main categories of objects to be placed:
- Entry Points which affect different entities in every mission and govern spawns/ ladders' initial position or belfries' movement
- Passages which govern transitions from one scene to another in SP
- Plants which are flora instances declared somewhere else than in module_* files of the MS
- Scene props (see: chapter 3)
- Item kinds (see: chapter 3)
8. Design of a scene with respect to its mission
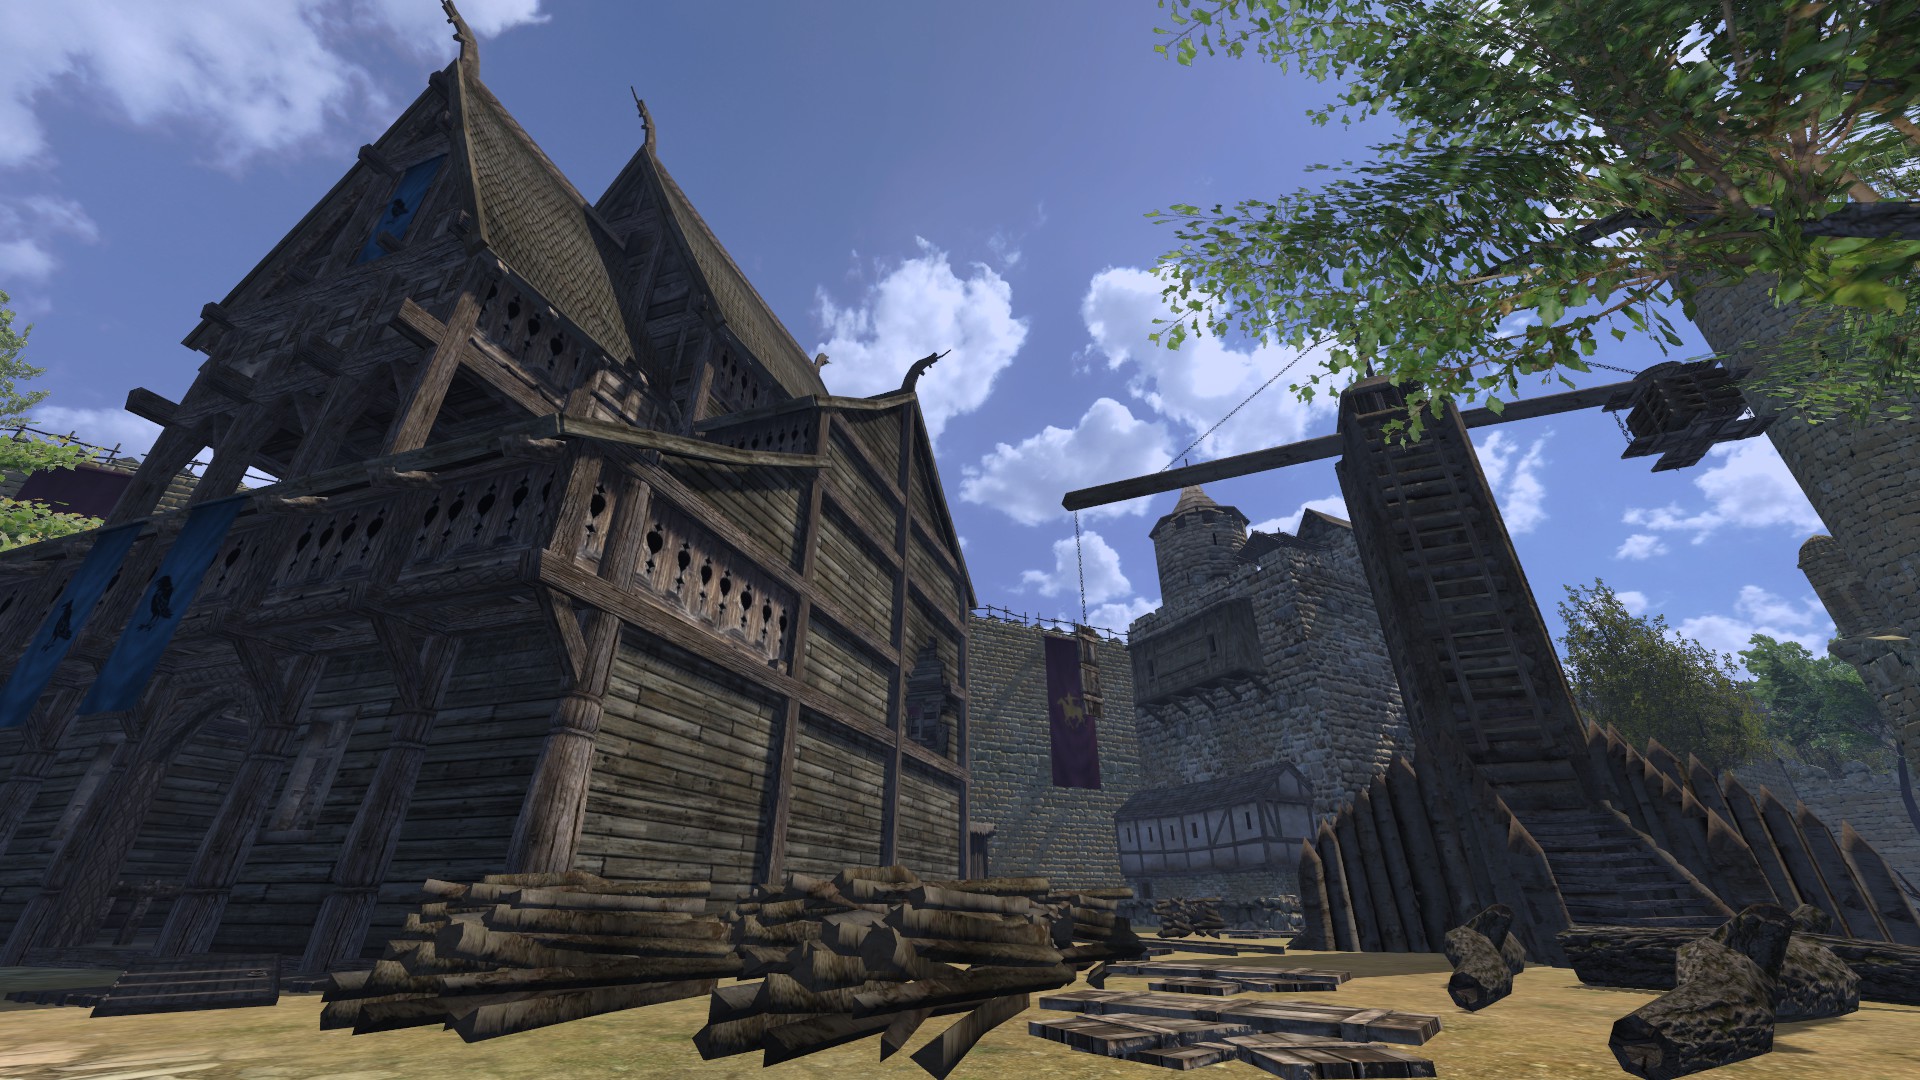
It must be tied to its purpose as far as its mission is concerned. For instance, MP Duel scene should ideally contain a flat surface to see all agents in a scene to seek them out and duel with them, MP Deathmatch scene should not be flat as to prevent cavalry hegemony, SP castle visit scene should not be located outdoors and so on. You may behold Native scenes to learn things; try to rate them from 1 to 5 and think about what is good or wrong with them. Native ones are good because everyone may easily access them. Categorize them by their aesthetics, gameplay (think of stupid elements like high elevation), lore (does a scene tell a story or is just boring [especially when it comes to MP ones]), innovation, creative prop placement/ combinations.
9. Aesthetics
Aesthetics are important as well. There are several architectonic types which are defined by their textures. One may use OpenBRF to scan the module for all object using the texture to make use of them later; thus, a consistent style will be preserved.
wall5 texture used very rarely on Native buildings; OpenBRF has been used to retrieve all items with the texture applied.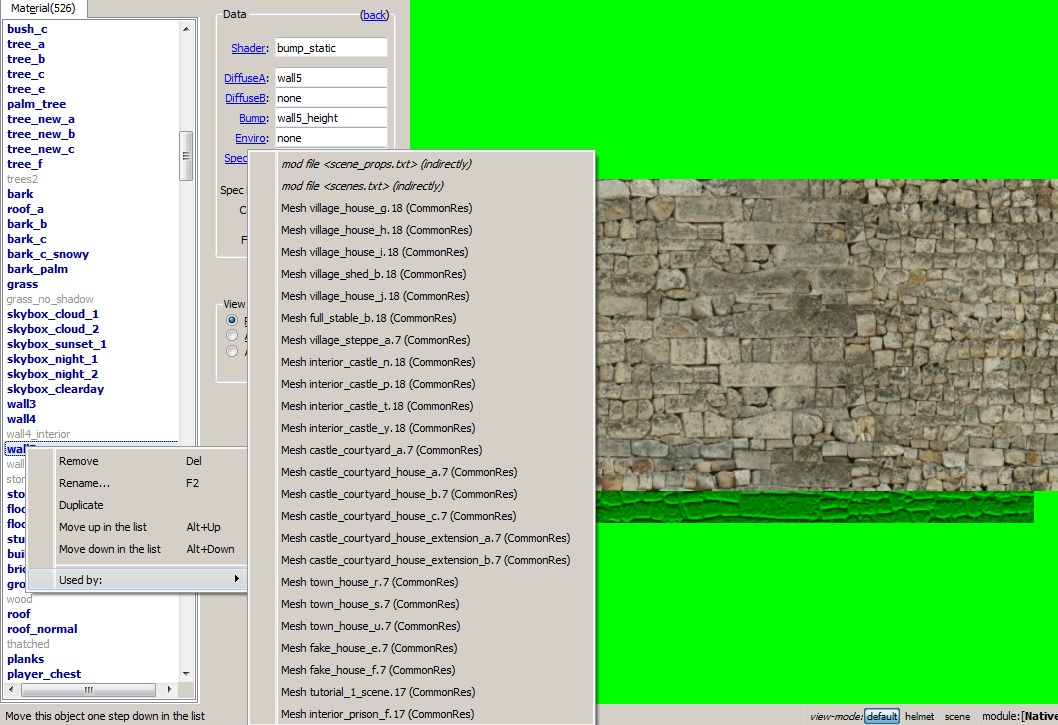
A scene made from buildings with
wall5 texture. As you can notice, the architectonic style has been preserved.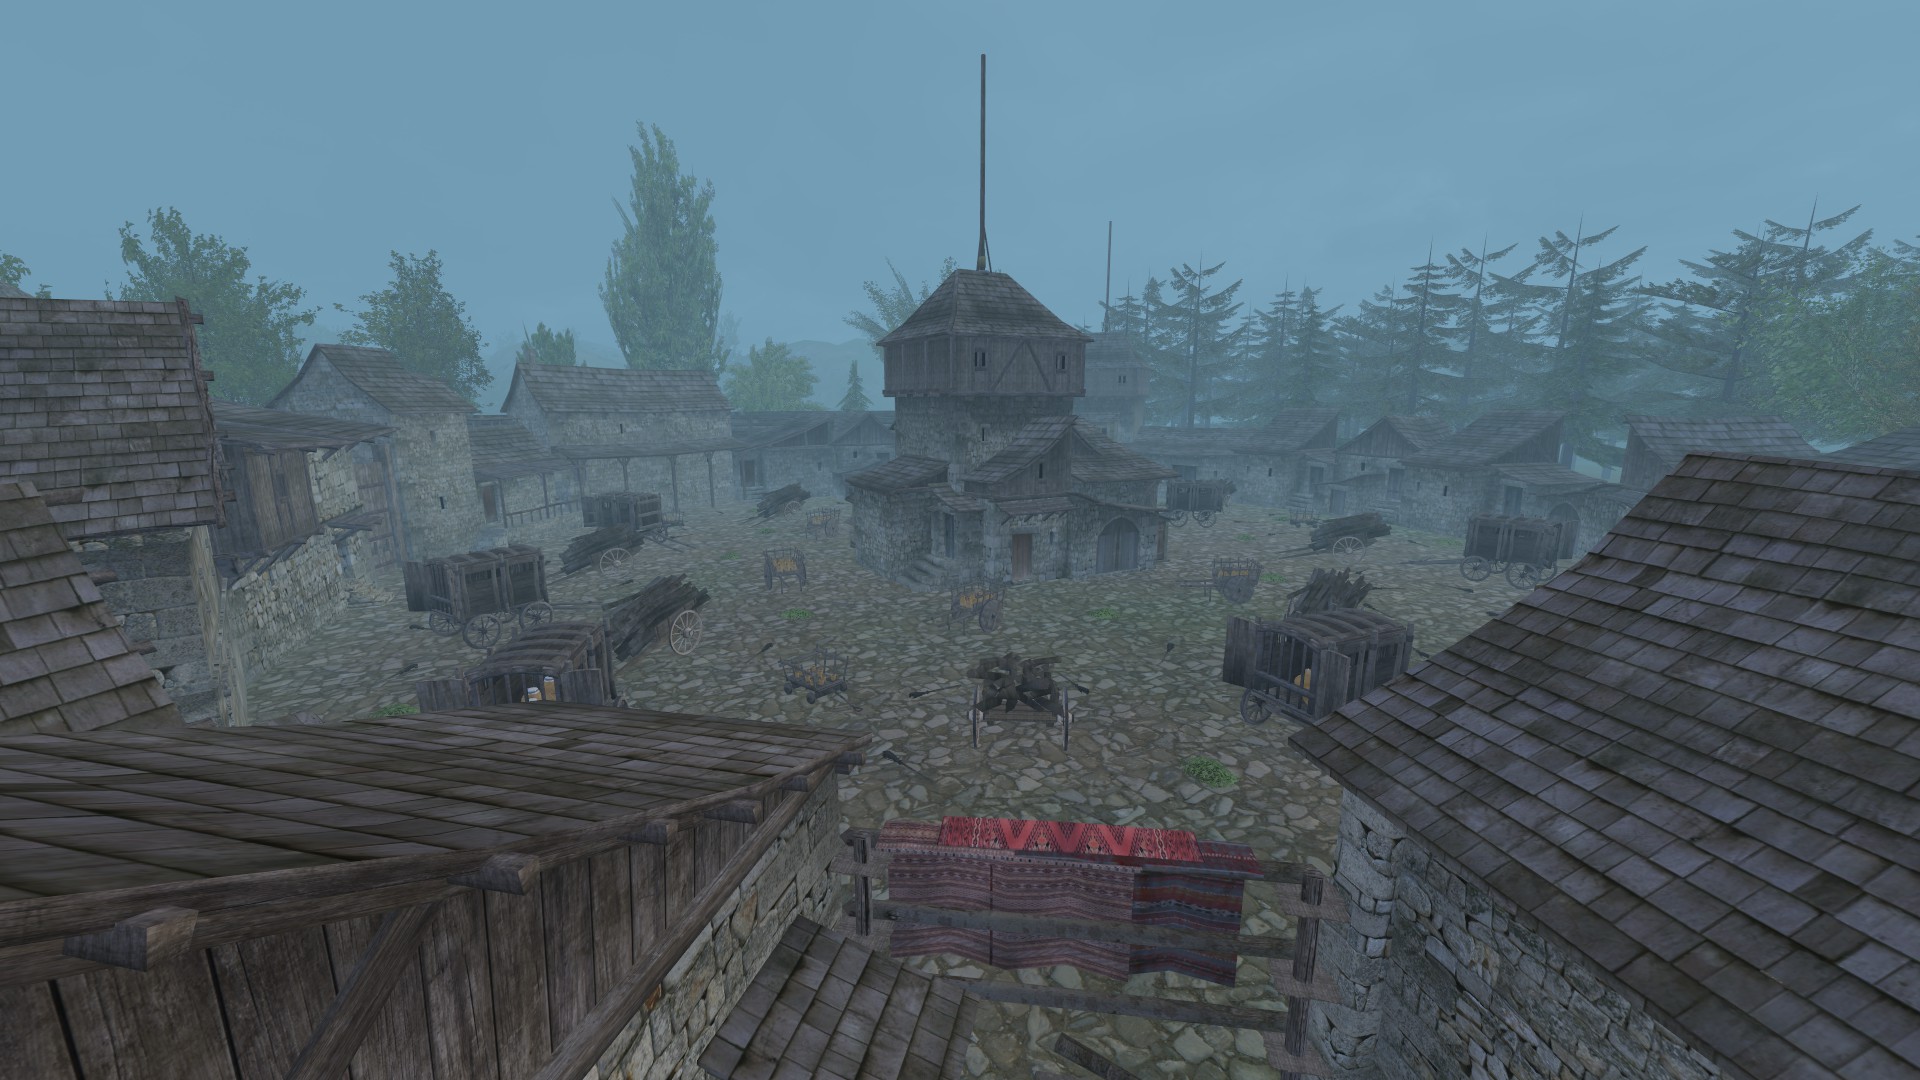
In this case, the Khergit town retains a coherent style. The Nordic structure in the foreground has been conceived as an embassy, hence it sticks out from the rest, but remains an object with clear purpose. The same applies to the Swadian trading facility in the background.
10. AI Mesh
Create AI Mesh is responsible for creating AI Mesh faces tied to polygons. It must be stressed that when AI Mesh is afterwards not modified at all, the file size remains the same. Otherwise, even a smallest change affects significantly the file size. There is no way to undo the action, but it can be easily worked around by switching to face mode and growing selection until it has all faces selected which can be deleted. Polygon size affects meaningfully the file size; let's examine the following experiment conducted by me. To illustrate the question, here are: terrain codes, their respective polygon size value and size after generating AI Mesh:
(note that I had to delete one face since AI Mesh does not affect file size if it is not modified and, therefore, it is exactly tied to a scene's terrain mesh).0x000000003007b2320005ad6b0000255e00001a0200007001 - 2 polygon size - 960 kB 0x000000033007b2320005ad6b0000255e00001a0200007001 - 5 polygon size - 525 kB
You can switch Vertex/ Edge/ Face mode which allow/ disallow some options. Conversion of selection is possible and the remaining operations are identical to ones from any 3D editor. Making AI Mesh tied to polygons may drastically affect the file size and make no hassle with bots getting stuck if there are no major obstacles in a scene. Also, surrounding a structure with AI Meshes placed selectively may frequently work without having to generate AI Mesh, which has its impact on file size and performance.
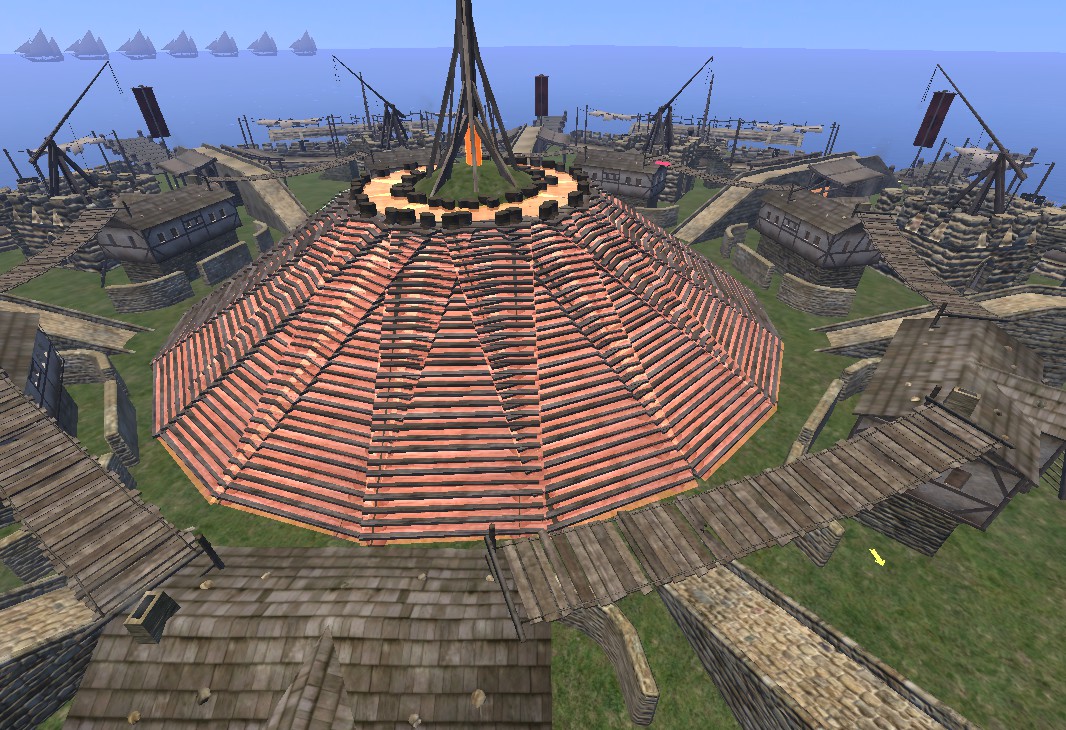
11. Blueprints
Using "rulers" is very useful to make perfectly geometrical scenes or their elements. For instance, spr_hook_a may be used for a violin-like curve. Moreover, spr_wheel and spr_brewery_big_bucket are my favorite props to make things on a circular plane.
A combination of a perfect circular island and a fort based on spr_brewery_big_bucket heptagonal shape. Each part of the fort (1/7) is effectively identical to adjacent ones.
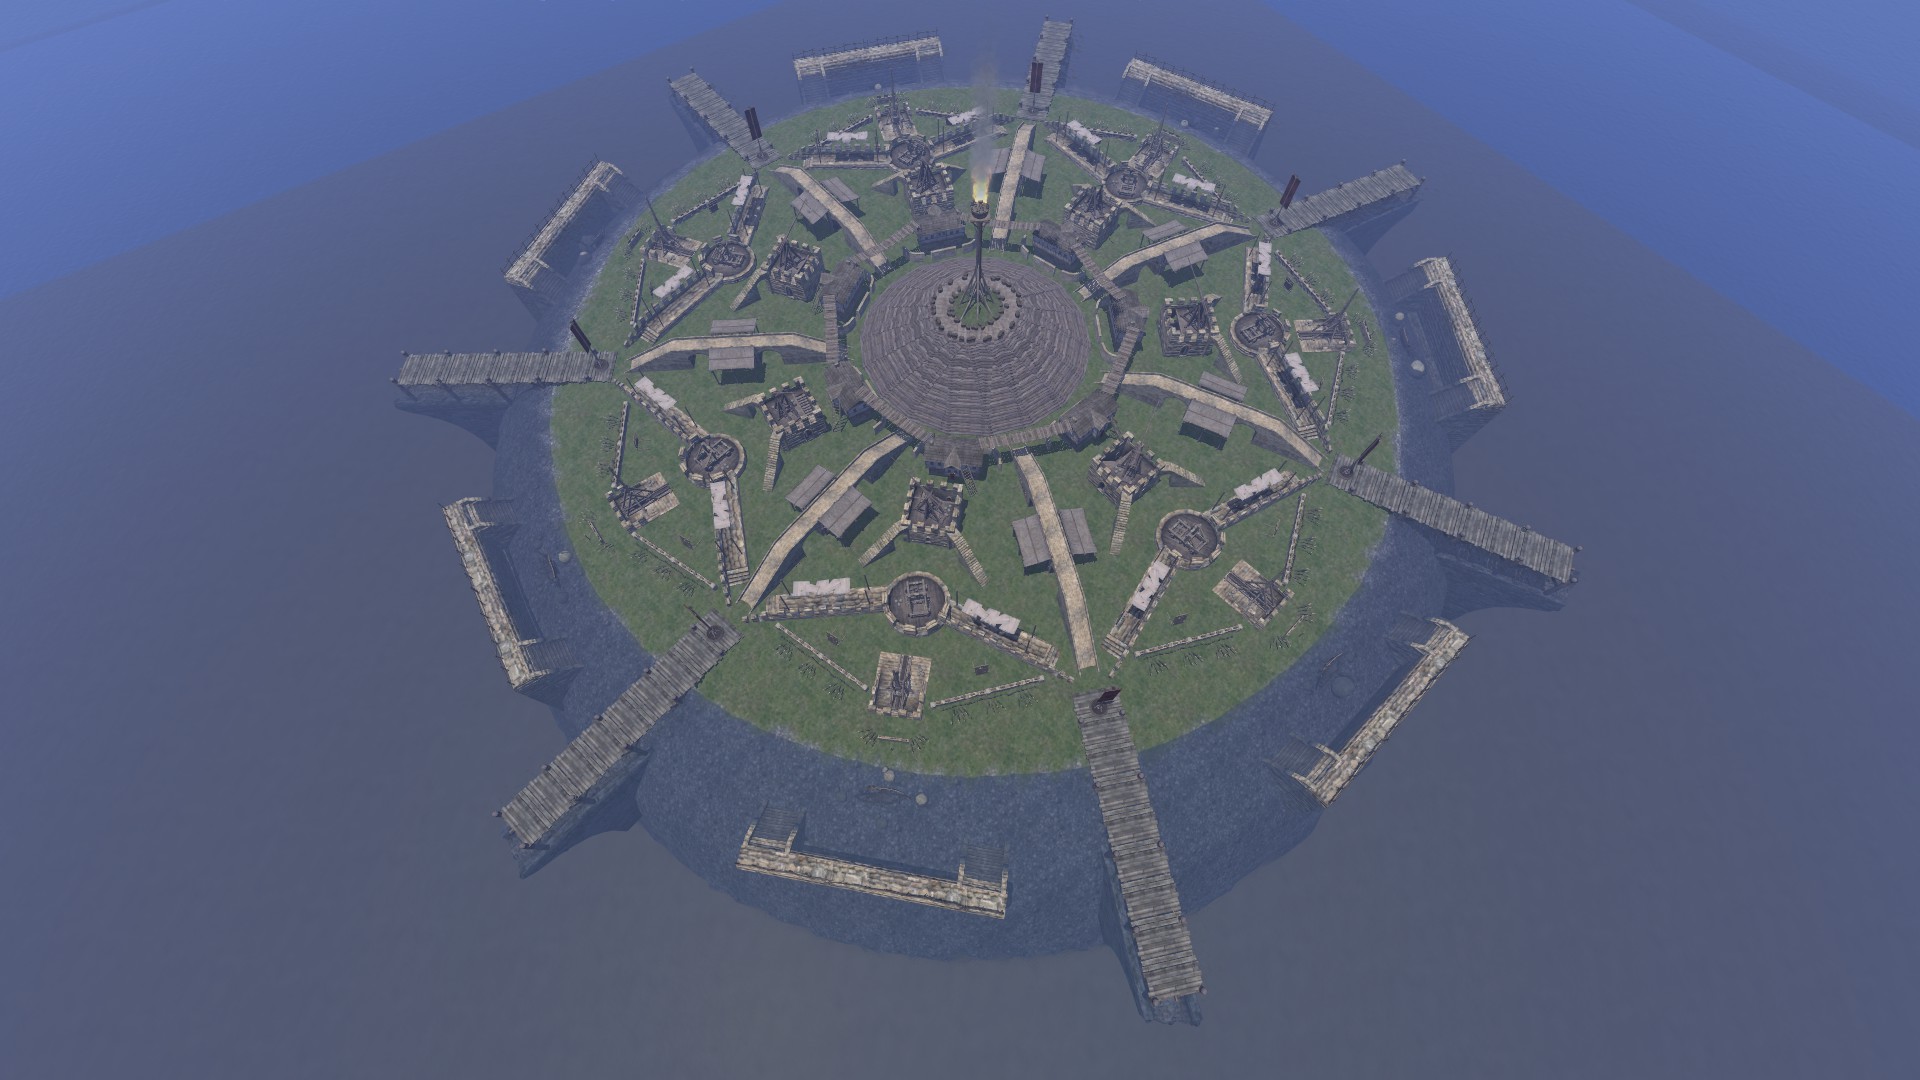
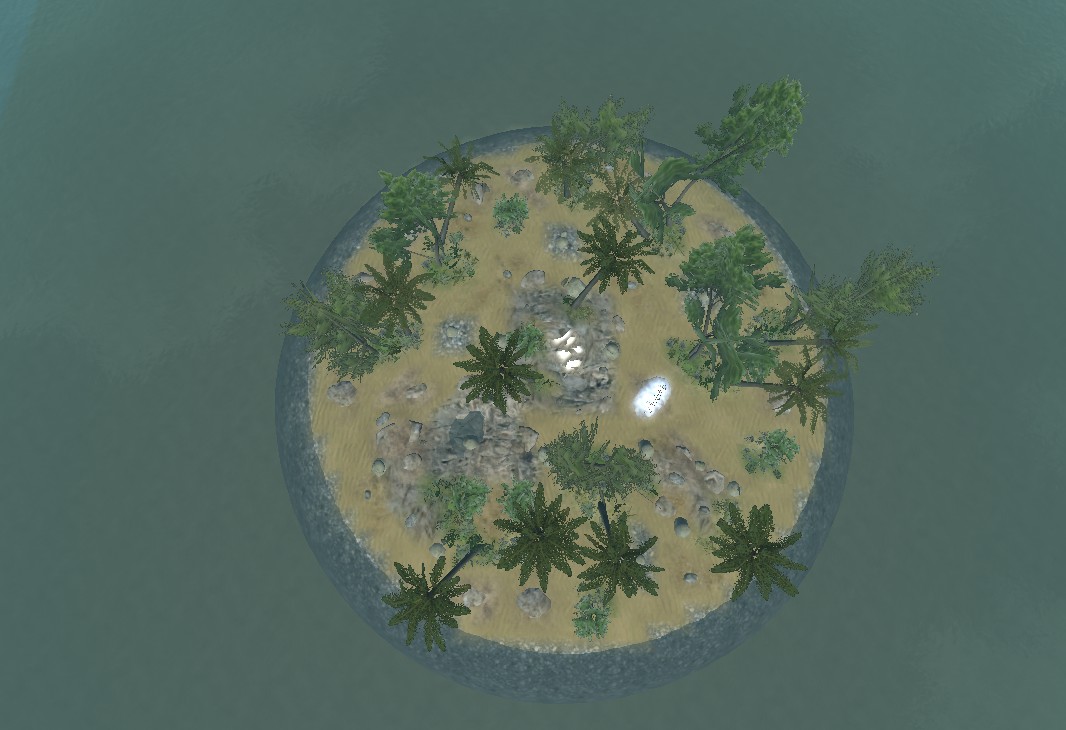
Making a circular island centered in the scene can be done by moving an object to be placed to the corner of the scene to grab maximum coordinates of the scene. Then, the values need to be divided by two and the object can serve as a point of reference. Afterwards, the sea bottom must be made by levelling the surface. Then, the camera must be positioned above the prop, from which a circle with given radius value will be elevated. The cursor must not move, otherwise the circle will not be perfect. Then, smoothening must be done without moving the camera; the cursor must return to the position of reference (that is why the scene prop is there for). If followed correctly, the island will be perfect on visible surface.
A perfectly round island.
A geometrical ring modelled on spr_wheel.
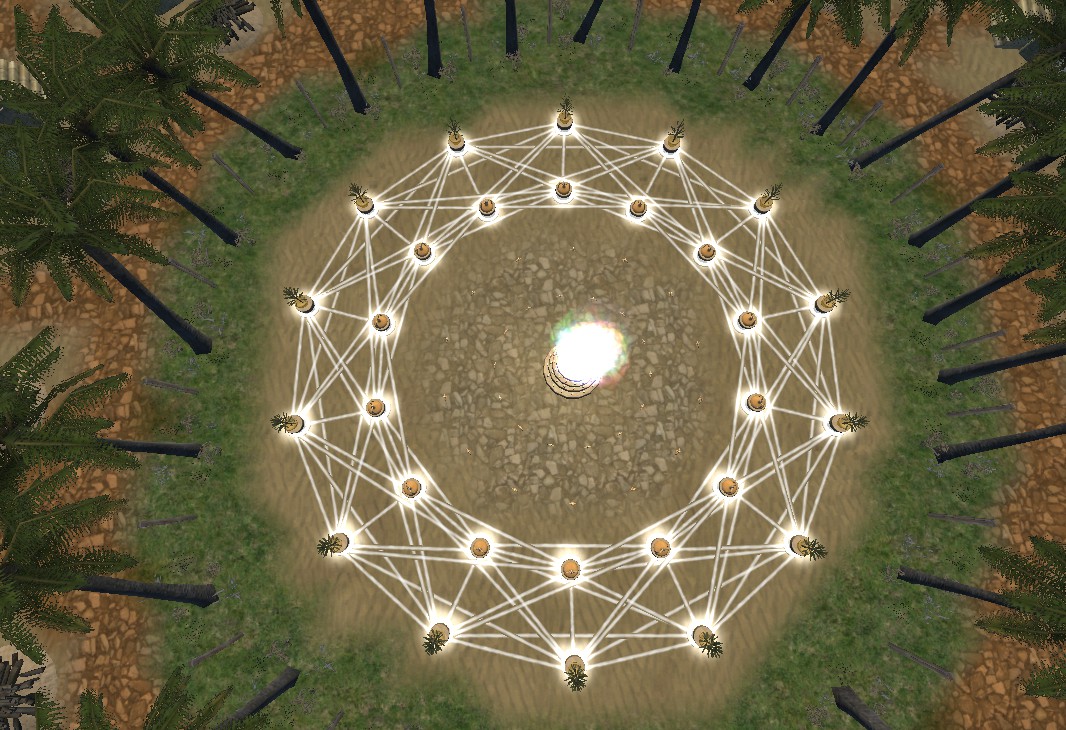
Also, the effect of some props can be strengthened by placing several instances of them in the same place. Their position must be remembered and typed into boxes in the panel, although their rotation must be adjusted manually as there are no boxes with respect to rotation in the panel.
Glow has been made more visible through the placement of several instances of spr_glow_a in the scene.
12. Terrain shading and presets (a standard nowadays)
M&B engine is old - hailing from the 2000s - and renders no terrain height difference in shades or ambient occlusion; it can be worked around with ground color paint. Terrain shading is also useful with some props, as will be shown below. The lack of presets that would make for nice combination of terrain shading and elevation - such as colored stones or roads - makes it harder to apply a mixture of effects at once; without presets something can be overlooked. Also, polygons are quite big and in fixed shape (straight from the 2000s) and there is no tool to combine terrain color/ elevation/ texture paint in one preset's effect on a polygon.
13. Collision meshes and agents' movement slowdown
Most solid objects have a collision mesh which defines where agents stop their movements if they try to pass through it. In other words, they are invisible barriers, but tied to a mesh. Some props have collision mesh maladjusted, therefore it is sometimes buggy. Also, some scene props' properties slow down agents; such props are spr_earth_stairs_b and spr_full_keep_b. In their case, some barriers must be placed on floor/ surface of them to make agents' movement normal.
Example of a maladjusted collision mesh which extends far beyond the visible boundaries of the prop at the top of it.

The issue has been addressed and tackled through the placement of barriers on the stairs.
14. Third-party* programs in particular useful when it comes to scening
- OpenBRF by mtarini - a must-have tool for browsing and modifying outer terrains, scene props or items,
- BladeEd by Lord Rich - a useful tool for reading .sco files' content, such as scene props/ terrain (visual preview) and for setting terrain properties from a heightmaps,
- SCO Reader by DoDoCat - a simple tool for reading .sco files' content (apparently only scene props),
- Terrain Generator by Swyter - a simple tool mimicking the panel found in SP Edit Mode (Terrain) [supports larger size of scenes than the game allows in the panel; has no preview like in SP panel],
- Terrain Generator by cmpxchg8b - a set of scripts mimicking the hardcoded mechanics of M&B WB engine.
*third-party = not made or officially endorsed by TW WB devs
15. Actions prone to crash the game while scening (and frequency of crashes when performing them), as reported by the community and assembled by me
Reportedly, running the game as administrator may help, as reported by a few sceners.
- choosing some entries of placed objects in the panel by double-clicking on them (guaranteed after a few selections),
- entering Edit Mode (very rarely),
- [having an error while] saving a very large scene made from scratch (very rarely),
- selecting a large, high-polygonal scene prop (very rarely),
- deleting an AI Mesh face when an AI-controlled agent is standing on it (probably guaranteed),
- generating AI Mesh on a scene with low polygon value [like 2 polygons] and large size {length x width}, so that the game runs out of memory and crashes (guaranteed),
- having AI Mesh generated on a scene with large size and further modifying it, thereby balancing on the verge of the game being out-of-memory (likely).
Last edited: