fierywrath
Recruit

Banner Making Tutorial for v 1.011 With Gimp
I made this tutorial because I was tired of not making my banners blend with the game and because I keep seeing Photoshop tutorials which unfortunately I do not have. Now just because I don't use Photoshop doesn't mean I don't invest enough into photo manipulation. It's truthfully because I don't have a lot of money and cannot get a job as I am a 15-year-old in an electric wheelchair and do not have a van. So please, no judging. Also be aware I do not yet know how to truly add banners to the game. Truthfully this is a replacement tutorial as I am not a genius at code.
Now you can download Gimp here: http://www.gimp.org/
And DDS converter here: http://eliteforce2.filefront.com/file/DDS_Converter;29412
It is at a lot of places so google it this link doesn't work.
OR Alternatively you can use the Gimp DDS extension provided by Svadil here: http://nifelheim.dyndns.org/~cocidius/dds/
and the Normalmap plugin here: http://nifelheim.dyndns.org/~cocidius/normalmap/
And that's all of the programs we need! Yay!
Now then on to the tutorial....
Getting Ready
After you install the latest version of Gimp (I used 2.6.4 in this tutorial) and DDS Converter start by opening one of the banner files located in the Mount&Blade directory on your computer with DDS Converter like below.

Note the address bar's location at "C:\Program Files" if you are new to modding Mount&Blade.
When DDS opens it should have the options as below:

Besides the folder options notice the input format which here is dds and the output format which for the sake of simplicity I am using bmp. Now I know bmp is editable by Paint on almost any computer but, paint just doesn't have the capabilities we need for a good banner.
I also want you to notice the opacity in the lower left. This option controls how visible DDS Converter is from bright to almost invisible.
Now that we are informed back to the banner. Here I opened banners_f and exported it as a bmp. You can close DDS after you export the banner file you wish to replace in your Native, Mod, or 1.011 altogether. Also make sure you remember where you exported the file as you will need to find it next step.
Editing the File
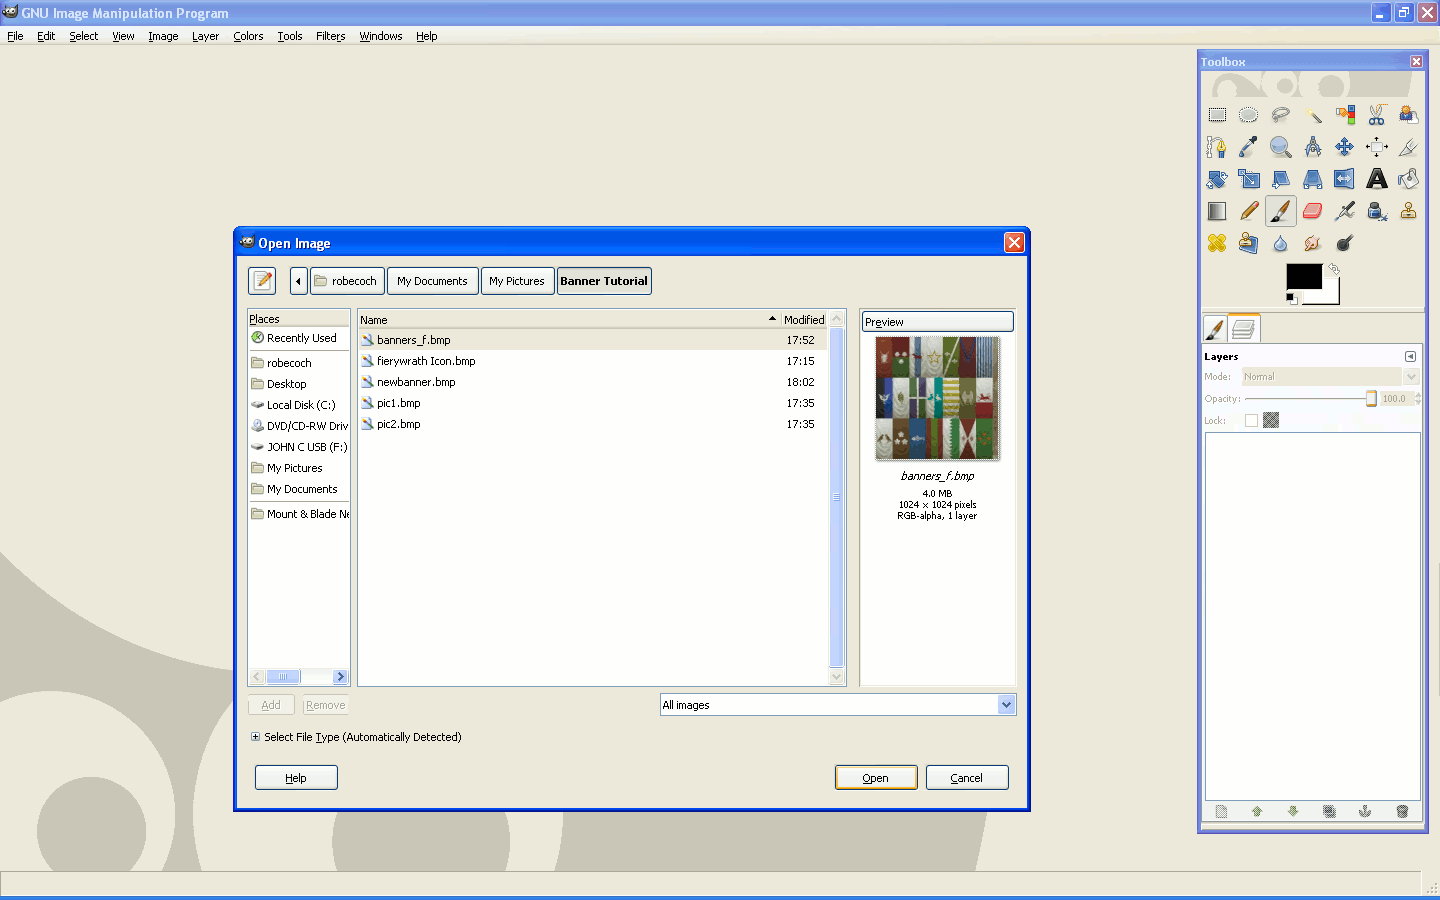
Now open Gimp as shown below and open the banner file you just exported. You should see something like what I have below. The only thing that varies is the picture you opened or where the Toolbox is.
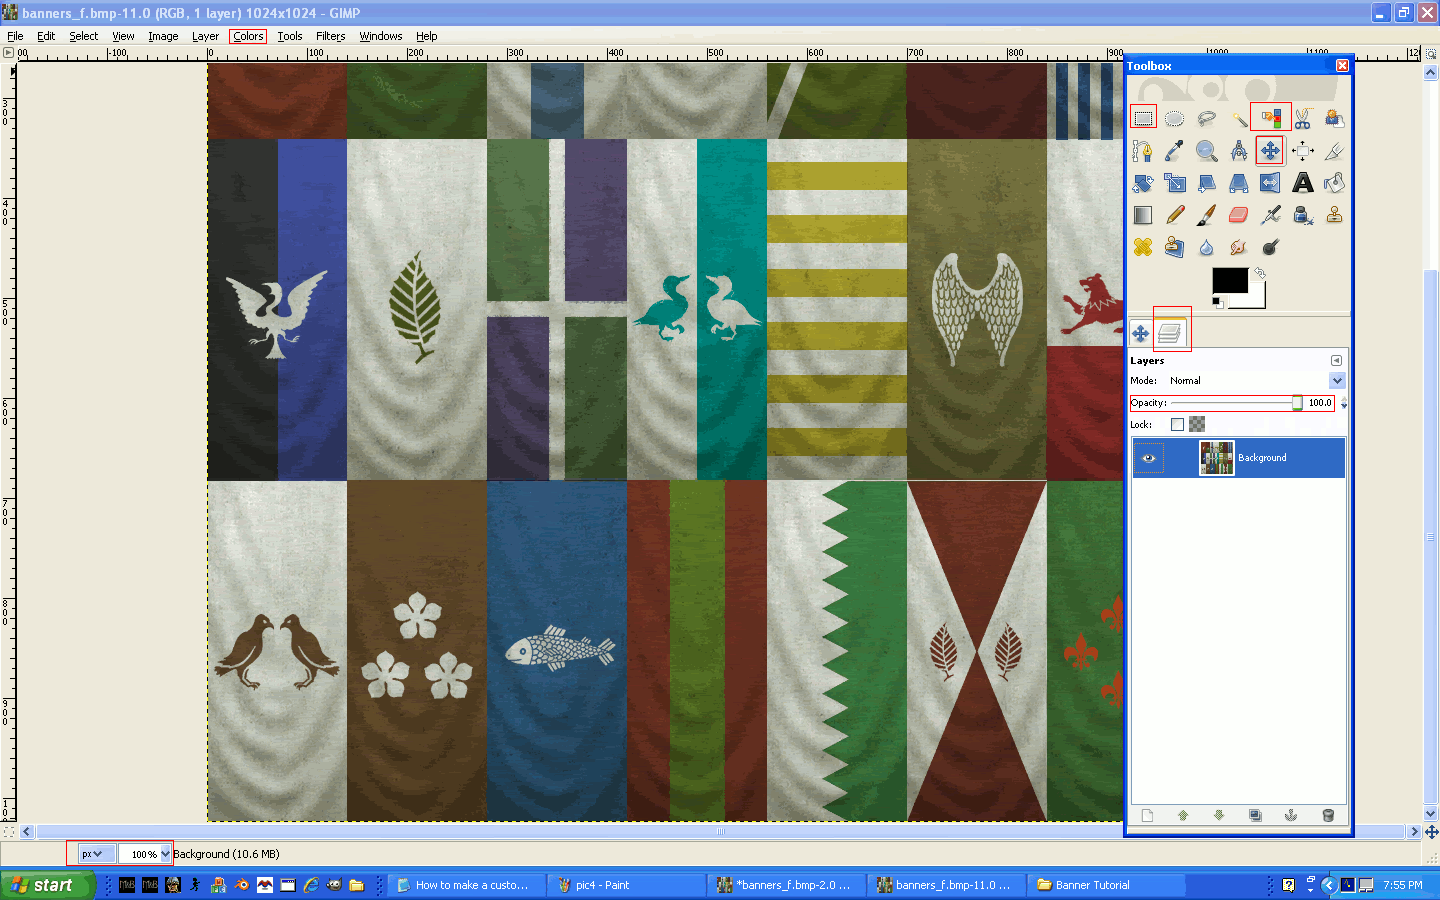
Now notice what all you have at your disposal to use as this is one of the most powerful FREE photo editors. What we will be using today is the select and color select tool and layers along with some of the color options and possibly the Move tool. In the second picture above I outlined the tools we will use in red.
Now we can either draw your banner using Gimp or for those of you not familiar with the program simply use paint. Here I opened my previously made banner for purposes of speed. Now if you opened yours and it appeared in the upper left corner simply use the move tool (the little four arrowed thing in the toolbox) to put it in place like below. If yours opened in a new window exit the new window and select open as layers in the original banner.
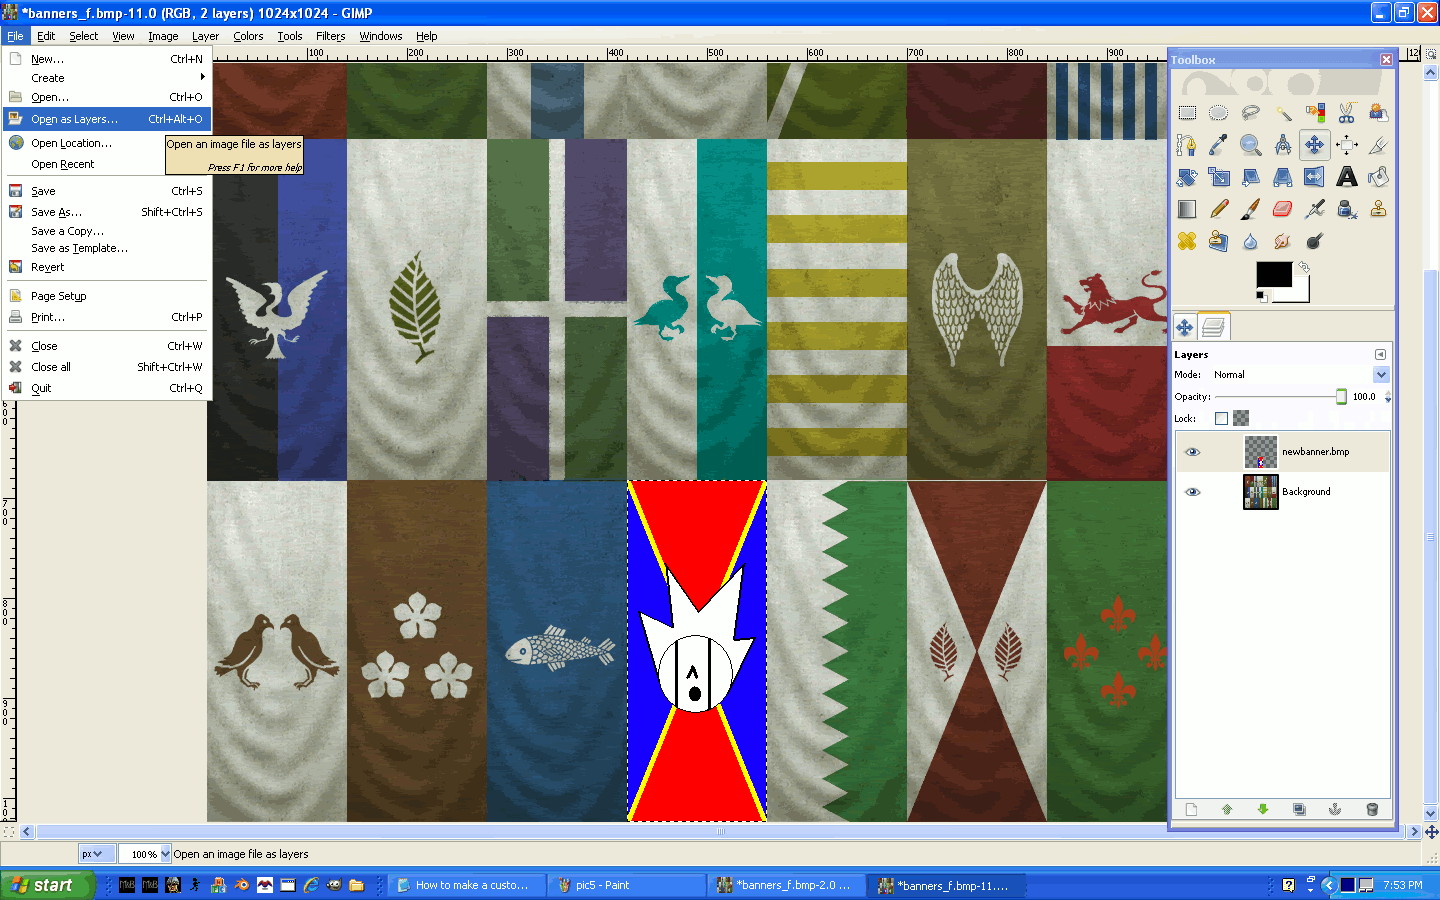
Now we get to mess with layers. Click the eye to the left of the layer that has your banner like below.
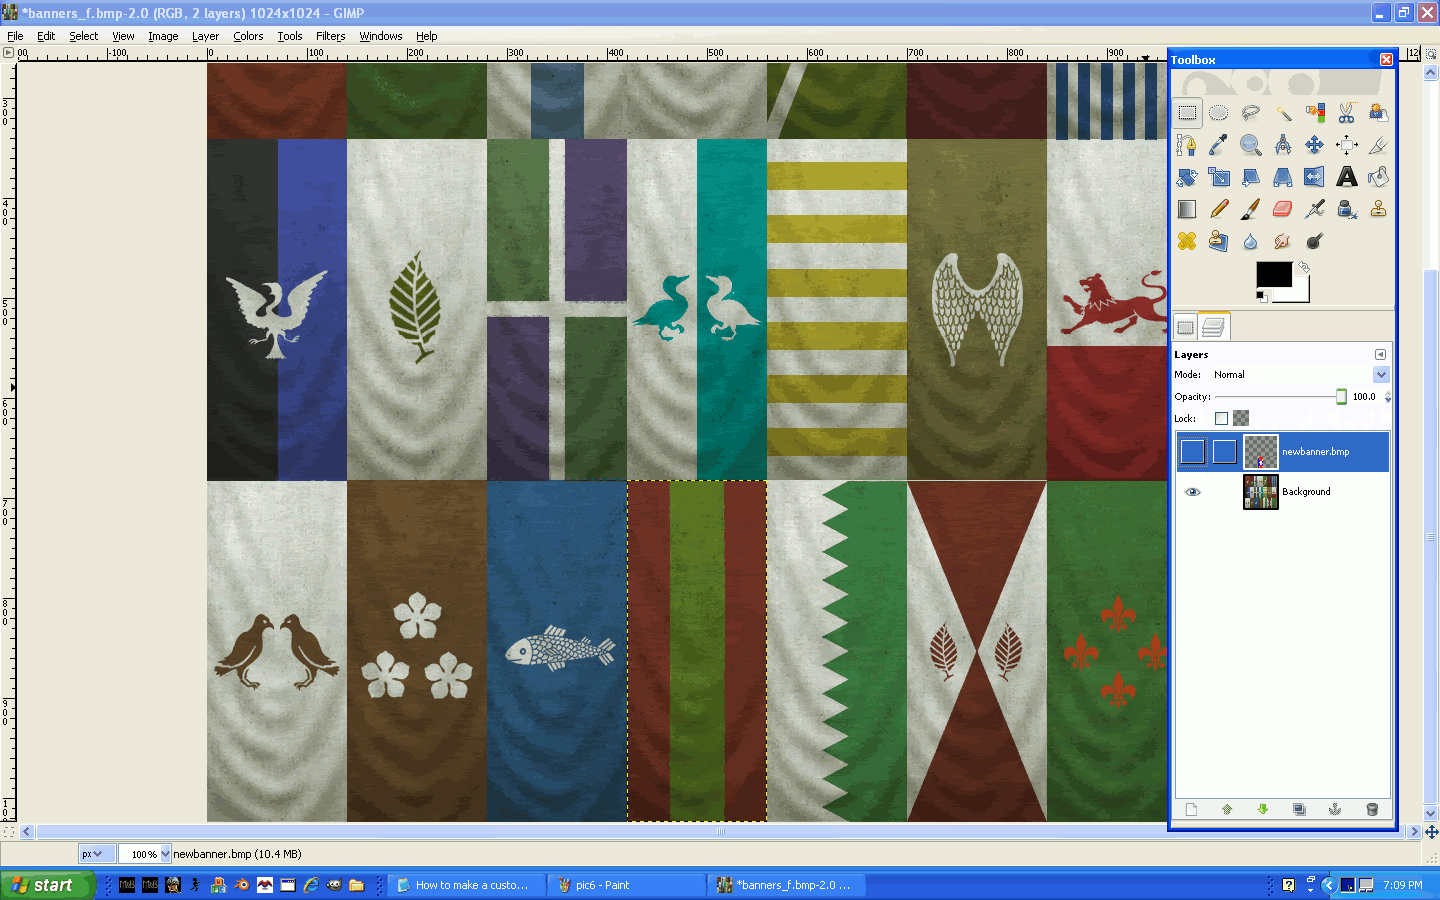
Your banner should disappear and that leaves us to prepare the banner's spot. Now be aware that banners that have white and black and things where there are drastic color changes might not work for this tutorial. Take a banner (maybe even mine) and copy and paste it where you want your banner at. Select the area your banner is going to be in with the select tool. Then click Colors_Desaturate. You should get a screen with the options Lightness, Luminosity, and Average. Click lightness and hit OK. You should get a screen like below. If nothing happened click Edit_Undo and make sure you select the background layer and then retry the step.
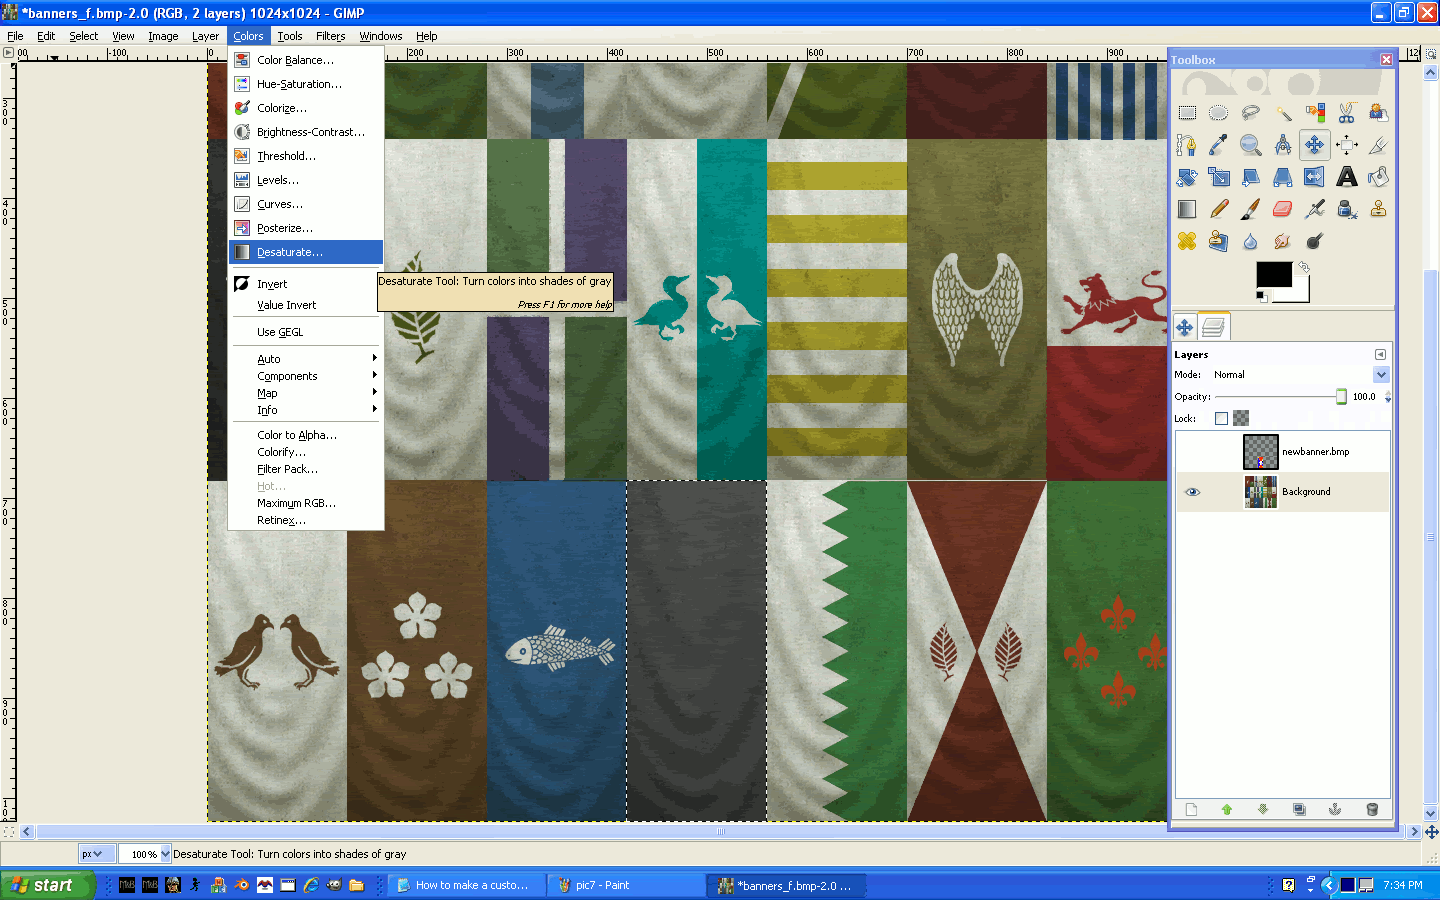
Now that it is black and white you can see that even though originally the image was different colors both sides are the same shades of gray. Those of you who know what you are doing with photo editing should note that this suggests a template was used and will help you a lot in the future for your own banner editing. Now we start on the actual banner "making".
The Manufacturing of Our Banner
Now we start to work on the coloration of this black and white picture. What I learned in a burst of inspiration was the Colors_Colorize tool. Now what we are going to do is take our banner and make it visible again. Take the little drag adjustor and lower the opacity to about 30.0% as seen below. (Alternatively you can use the multiply feature if you have experience with photoediting.
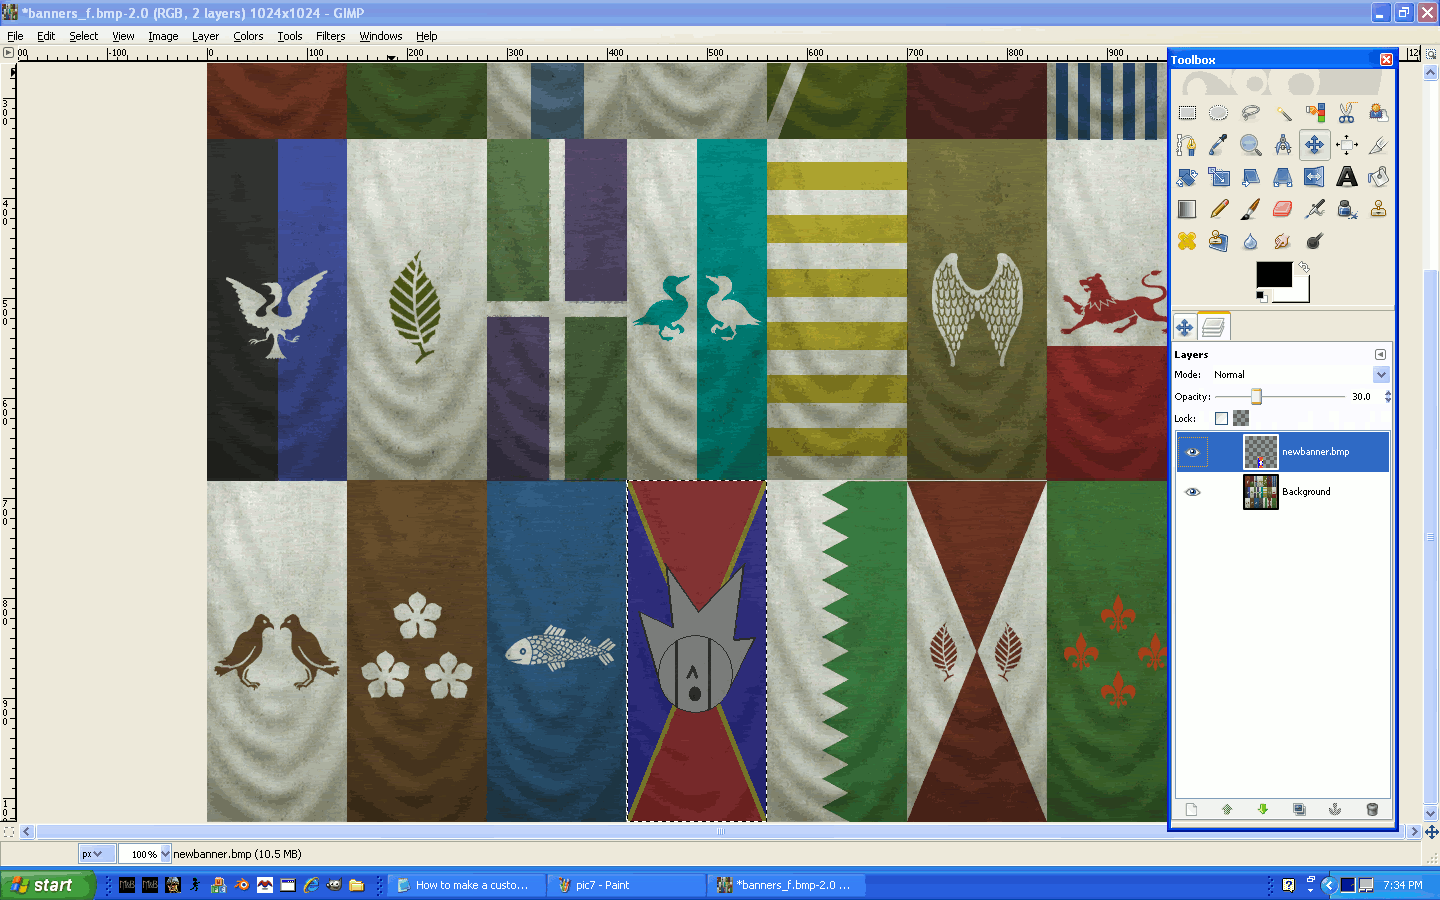
Now take the color select tool (the hand with the blue/red/yellow bar). And select a color on the layer you lowered the opacity level on like below.
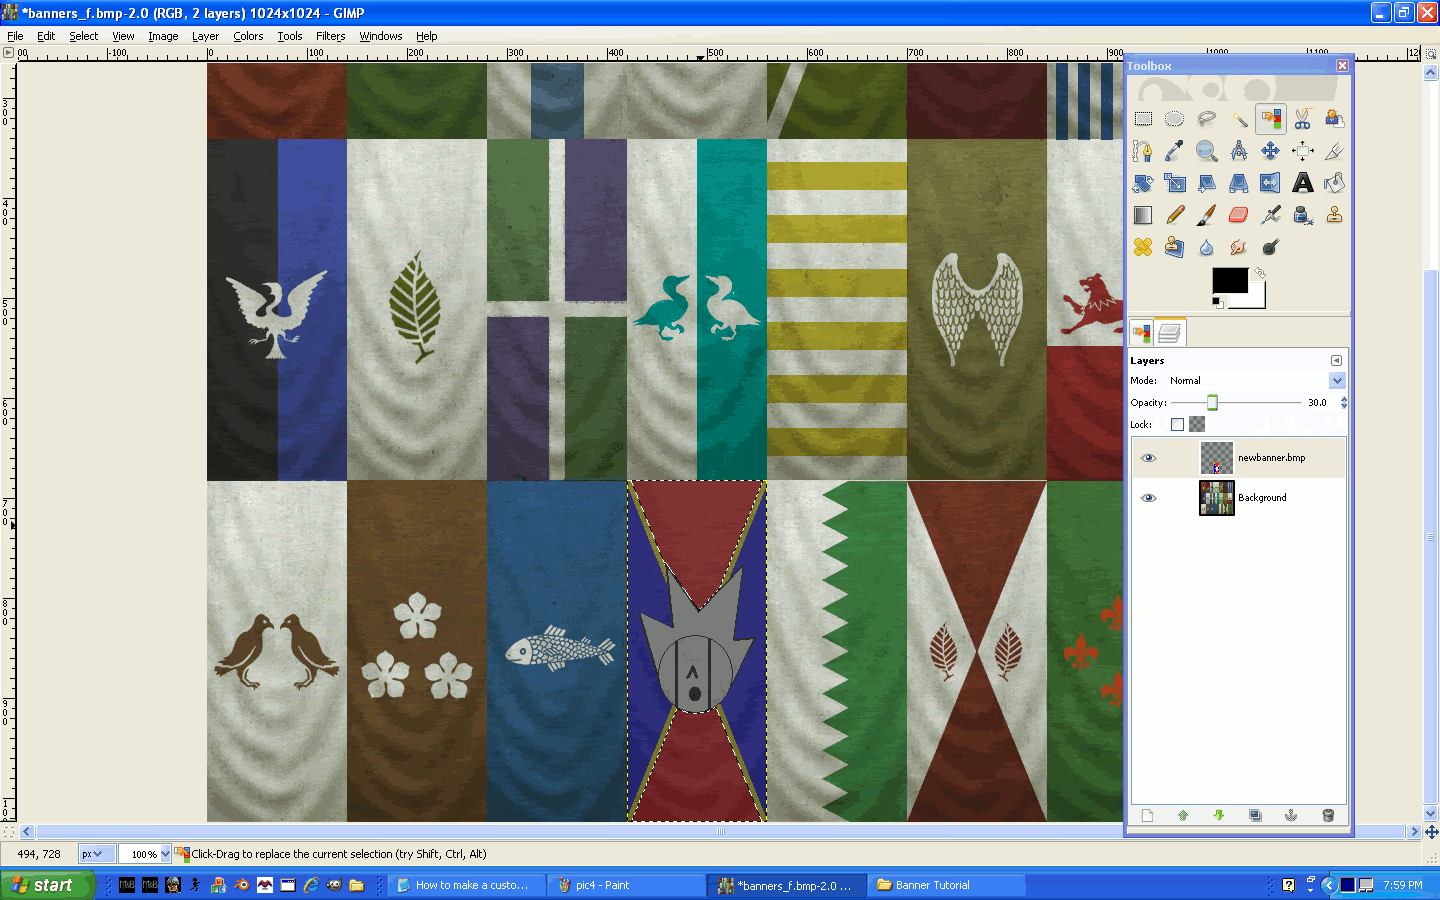
Here I selected red. Click the eye for that layer and select the background layer. It should look like the picture below. Then click Colors_Colorize.
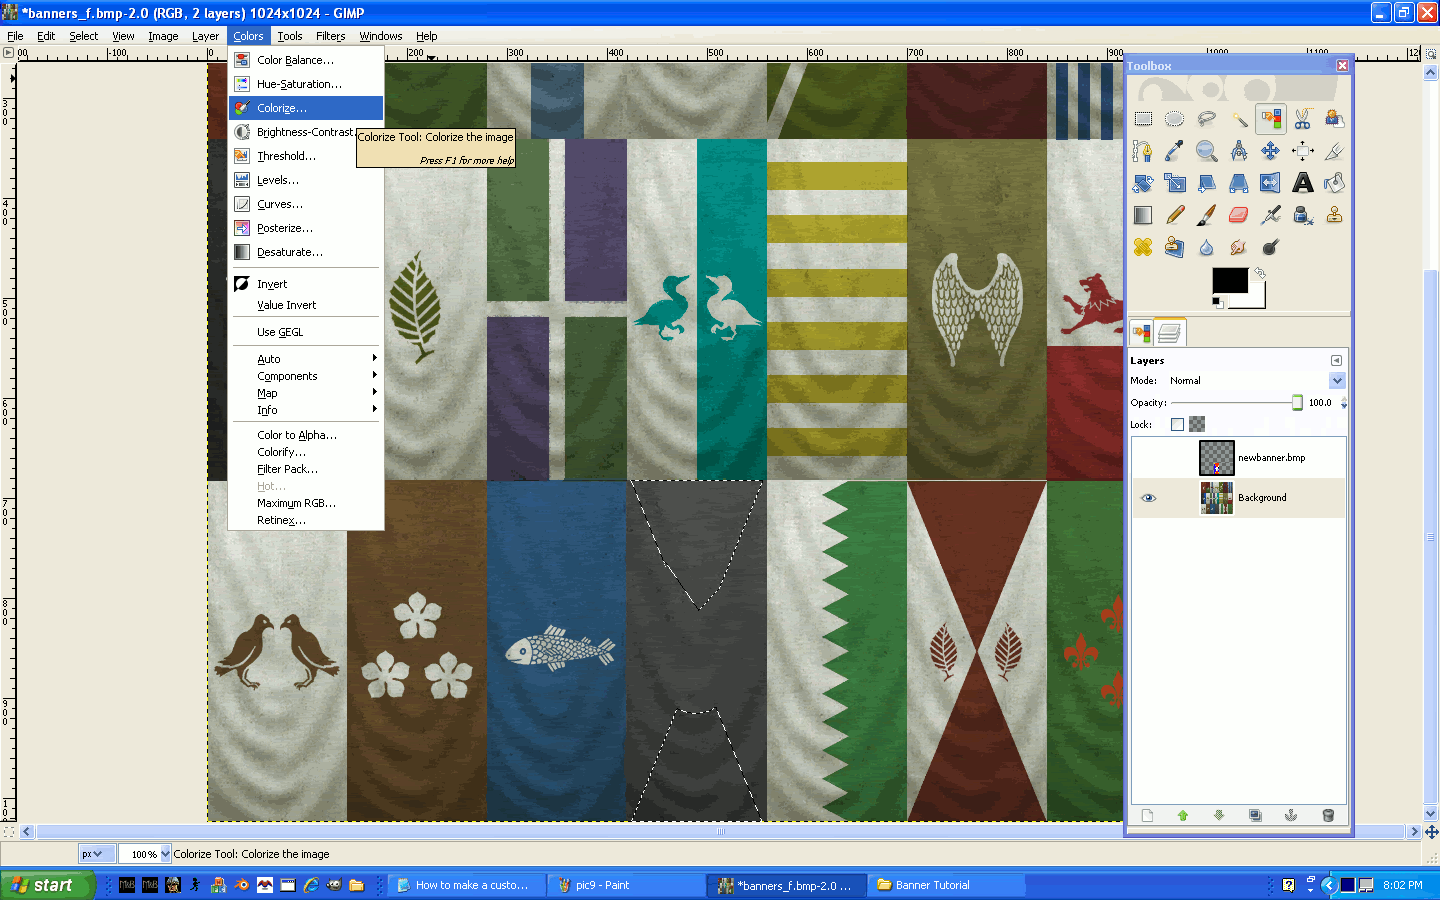
The window that pops up has three options as seen below. Hue changes the color, Saturation changes how much of the color is there and Lightness controls how bright it is as seen below.
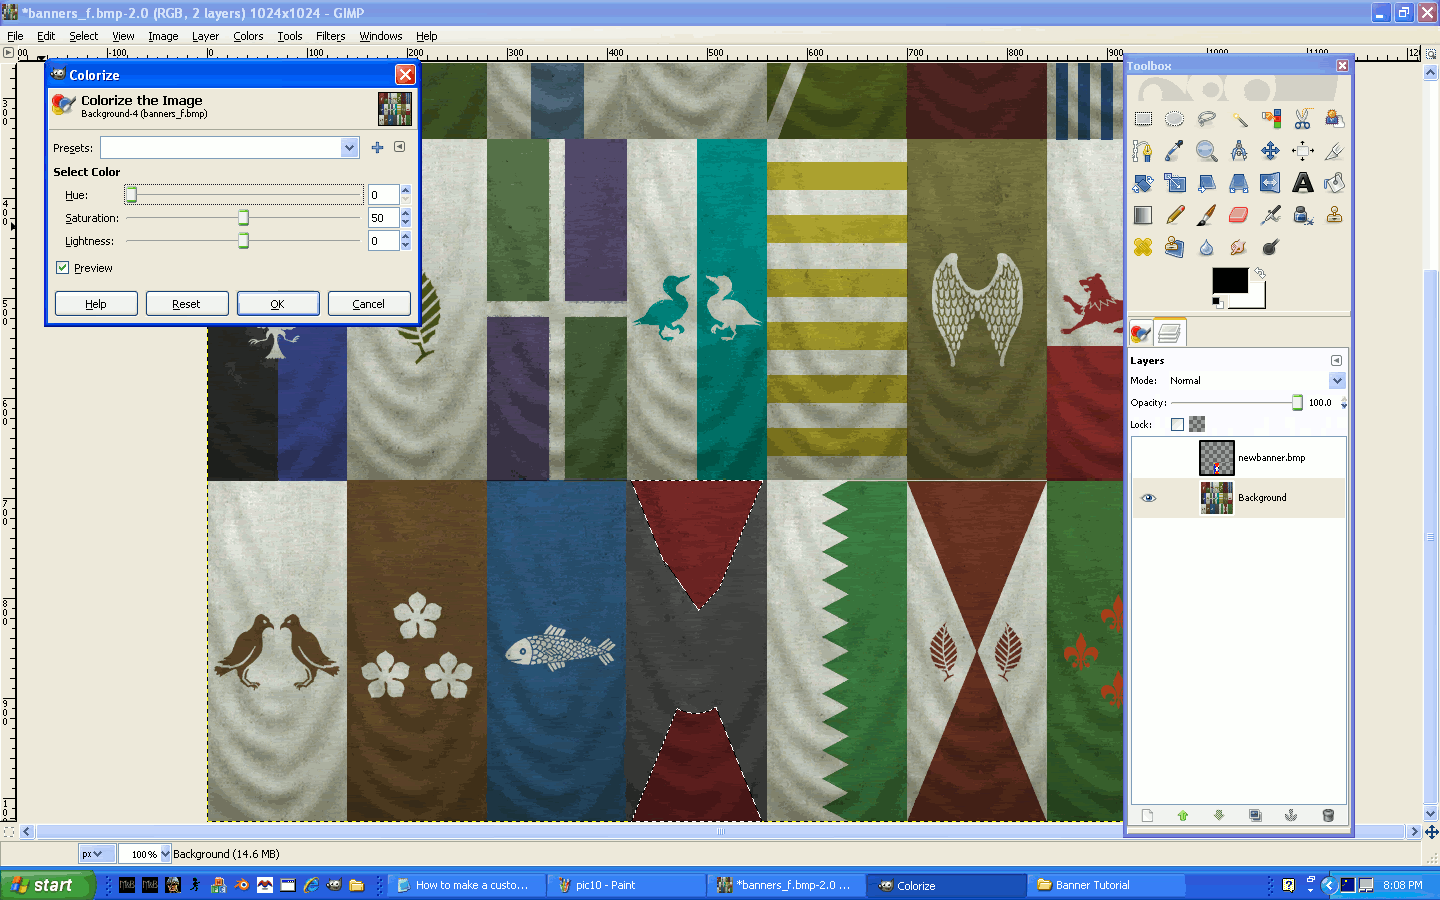
You repeat the same step with each color. Just watch the Saturation and Lightness so that you do not take away the banner's wavy shape.
Alternatively for black and white you can use the brightness/contrast color tool which I find makes the whites and blacks look more vivid and blend smoother.
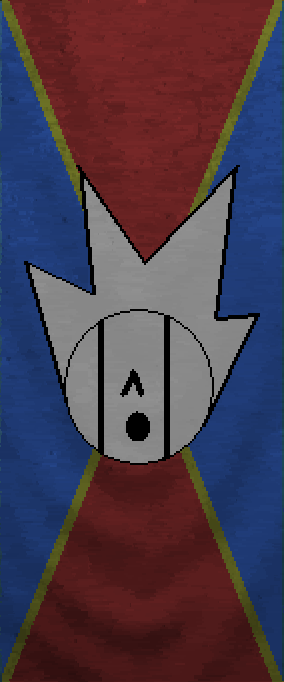
Here is the end result for mine.
For Those Who are New to Modding[/b]
To put this in the game you need to do some more stuff.
I saved my banners as "mynewbanners". After that you can close Gimp. Now depending on where you want this banner you need to follow different steps. Open the folder you saved this to and open it in DDS Converter. Change the input to bmp (or All supported formats) then change the Output format to dds and hit Convert after checking the Output folder.
You should end up with a nice clean dds format file with the name in my case being "mynewbanners". Now if you want this to be in all mods of Mount&Blade that do not have separate banners like the Star Wars Calradia mod does simply rename it to "banners_f" and place it in your Mount&Blade v1.011 Textures folder.
However if you want to put it in a mod you might have to copy and paste it into one of the mods banner files if it has its own banners. If it's Native or another mod that doesn't have its own banners add "load_mod_resource = textures" before the "load_resource = textures" in the module's "module.ini" file and put your texture in the mod's textures file. When you do this it still has to be renamed to "banners_f" so the game will recognize it as a banner file.
A Method for Perfection
While I do not have any pictures posted yet I do have some advice for those that want brighter colors that are still ingrained with the wavy shape. The one I made in the tutorial is not because I found this out afterwards just playing around.
Take the Colors_Colorize step except instead of adjusting Saturation and Lightness leave them in the center or move them there. Only select the Hue here and get the color that you want. Then take the Colors_Brightness/Contrast tool and open it up. Two adjusters should be there: Brightness and Contrast. The Brightness controls how vivid the color is and Contrast controls how much of the banner's shape shows through the color. Using this you can get a nice mix of color and wave to make your banners look authentic. I used it and asked someone who did not play Mount&Blade to tell me which one was the added banner and they couldn't see the difference. Hope it helps!
I made this tutorial because I was tired of not making my banners blend with the game and because I keep seeing Photoshop tutorials which unfortunately I do not have. Now just because I don't use Photoshop doesn't mean I don't invest enough into photo manipulation. It's truthfully because I don't have a lot of money and cannot get a job as I am a 15-year-old in an electric wheelchair and do not have a van. So please, no judging. Also be aware I do not yet know how to truly add banners to the game. Truthfully this is a replacement tutorial as I am not a genius at code.
Now you can download Gimp here: http://www.gimp.org/
And DDS converter here: http://eliteforce2.filefront.com/file/DDS_Converter;29412
It is at a lot of places so google it this link doesn't work.
OR Alternatively you can use the Gimp DDS extension provided by Svadil here: http://nifelheim.dyndns.org/~cocidius/dds/
and the Normalmap plugin here: http://nifelheim.dyndns.org/~cocidius/normalmap/
And that's all of the programs we need! Yay!
Now then on to the tutorial....
Getting Ready
After you install the latest version of Gimp (I used 2.6.4 in this tutorial) and DDS Converter start by opening one of the banner files located in the Mount&Blade directory on your computer with DDS Converter like below.

Note the address bar's location at "C:\Program Files" if you are new to modding Mount&Blade.
When DDS opens it should have the options as below:

Besides the folder options notice the input format which here is dds and the output format which for the sake of simplicity I am using bmp. Now I know bmp is editable by Paint on almost any computer but, paint just doesn't have the capabilities we need for a good banner.
I also want you to notice the opacity in the lower left. This option controls how visible DDS Converter is from bright to almost invisible.
Now that we are informed back to the banner. Here I opened banners_f and exported it as a bmp. You can close DDS after you export the banner file you wish to replace in your Native, Mod, or 1.011 altogether. Also make sure you remember where you exported the file as you will need to find it next step.
Editing the File
Now open Gimp as shown below and open the banner file you just exported. You should see something like what I have below. The only thing that varies is the picture you opened or where the Toolbox is.


Now notice what all you have at your disposal to use as this is one of the most powerful FREE photo editors. What we will be using today is the select and color select tool and layers along with some of the color options and possibly the Move tool. In the second picture above I outlined the tools we will use in red.
Now we can either draw your banner using Gimp or for those of you not familiar with the program simply use paint. Here I opened my previously made banner for purposes of speed. Now if you opened yours and it appeared in the upper left corner simply use the move tool (the little four arrowed thing in the toolbox) to put it in place like below. If yours opened in a new window exit the new window and select open as layers in the original banner.

Now we get to mess with layers. Click the eye to the left of the layer that has your banner like below.

Your banner should disappear and that leaves us to prepare the banner's spot. Now be aware that banners that have white and black and things where there are drastic color changes might not work for this tutorial. Take a banner (maybe even mine) and copy and paste it where you want your banner at. Select the area your banner is going to be in with the select tool. Then click Colors_Desaturate. You should get a screen with the options Lightness, Luminosity, and Average. Click lightness and hit OK. You should get a screen like below. If nothing happened click Edit_Undo and make sure you select the background layer and then retry the step.

Now that it is black and white you can see that even though originally the image was different colors both sides are the same shades of gray. Those of you who know what you are doing with photo editing should note that this suggests a template was used and will help you a lot in the future for your own banner editing. Now we start on the actual banner "making".
The Manufacturing of Our Banner
Now we start to work on the coloration of this black and white picture. What I learned in a burst of inspiration was the Colors_Colorize tool. Now what we are going to do is take our banner and make it visible again. Take the little drag adjustor and lower the opacity to about 30.0% as seen below. (Alternatively you can use the multiply feature if you have experience with photoediting.

Now take the color select tool (the hand with the blue/red/yellow bar). And select a color on the layer you lowered the opacity level on like below.

Here I selected red. Click the eye for that layer and select the background layer. It should look like the picture below. Then click Colors_Colorize.

The window that pops up has three options as seen below. Hue changes the color, Saturation changes how much of the color is there and Lightness controls how bright it is as seen below.

You repeat the same step with each color. Just watch the Saturation and Lightness so that you do not take away the banner's wavy shape.
Alternatively for black and white you can use the brightness/contrast color tool which I find makes the whites and blacks look more vivid and blend smoother.
Here is the end result for mine.

For Those Who are New to Modding[/b]
To put this in the game you need to do some more stuff.
I saved my banners as "mynewbanners". After that you can close Gimp. Now depending on where you want this banner you need to follow different steps. Open the folder you saved this to and open it in DDS Converter. Change the input to bmp (or All supported formats) then change the Output format to dds and hit Convert after checking the Output folder.
You should end up with a nice clean dds format file with the name in my case being "mynewbanners". Now if you want this to be in all mods of Mount&Blade that do not have separate banners like the Star Wars Calradia mod does simply rename it to "banners_f" and place it in your Mount&Blade v1.011 Textures folder.
However if you want to put it in a mod you might have to copy and paste it into one of the mods banner files if it has its own banners. If it's Native or another mod that doesn't have its own banners add "load_mod_resource = textures" before the "load_resource = textures" in the module's "module.ini" file and put your texture in the mod's textures file. When you do this it still has to be renamed to "banners_f" so the game will recognize it as a banner file.
A Method for Perfection
While I do not have any pictures posted yet I do have some advice for those that want brighter colors that are still ingrained with the wavy shape. The one I made in the tutorial is not because I found this out afterwards just playing around.
Take the Colors_Colorize step except instead of adjusting Saturation and Lightness leave them in the center or move them there. Only select the Hue here and get the color that you want. Then take the Colors_Brightness/Contrast tool and open it up. Two adjusters should be there: Brightness and Contrast. The Brightness controls how vivid the color is and Contrast controls how much of the banner's shape shows through the color. Using this you can get a nice mix of color and wave to make your banners look authentic. I used it and asked someone who did not play Mount&Blade to tell me which one was the added banner and they couldn't see the difference. Hope it helps!


