SCENES CREATION FOR NOOBS
A tutorial by a noob for noobs
[Intro] you can skip it if you want and go to
Well, you all probably once had a secret desire to do scenes but you didn’t understand it because it sounds nice but also same time very boring. And all these tutorials and videos are kind of boring too, and the few short good tutorials disappear for obscure reasons. One hour of youtube video to learn how to place three houses on the terrain WTF!! Unfortunately most of the sceners have learned like this, or i don’t know how, personally i've had a hard times when i started while it’s not so complicated... hence the writing of this speed tuto that will save you a lot of trouble.
With this tutorial we will go straight to the point, like become a scener in a few days/weeks of practice! You become a scener the day you did a whole scene all alone ^^
First we will spend all the blah blah on how to create a scene in the multiplayer with the Warband terrain generator it is really very boring for a noob and it is the subject of the beginning of a big famous video tutorial. When we just want to make a "castle", yes like when we were kids with our Legos ! The Legos manuals were very well explained. Everyone was able to build the model of the castle and the creation of scene in Warband (called also scening) is the same: if you explain it well, i think that anyone can become a scener, at least those who already managed to make their Lego castle when they were kids have their chances to achieve this.
First of all, simply check "Enable edit mode" in the Warband launch/config panel; you can also tick "Start windowed" if you need to consult tutorials same time as you scene. You start a game you play, you go to a scene and then the adventure begins...
Entering/Exiting the Warband Scene Editor
Your character is in a scene: click on ctrl+E and there you are in the Warband scene editor!
How to get out the scene editor? Same ctrl+E
Take care not to save the changes so click on "discard changes" if you do not want to modify the scene: if you are just in tourist mode who just wants to visit the scenes. If you have moved a props by mistake because you are a big noob and you click save: your scene will be modify!
So you have understood most of the time you will click on save because most of the time when we go in a scene and we are a scener it is to modify scenes!
In summary: enter and exit the editor it is ctrl+E then you choose to save modifications you did (save) or not (discard changes)
Explore/navigate in a scene
I advise you simply to start learning to "explore" the scenes. How to navigate into the scene? Here are the controls!!!
To navigate into the scene the commands keys are (push and hold the key + mouse same time for directions: rotates the viewing angle)
W forward
S backward
D go to the right
A go to the left
Train yourself slowly to move, oh... This is already very slow ? It’s normal and don't worry there is a trick to speed up this move: to speed up the navigation it is necessary to double push and then hold the key and at the same time "pilot" with the mouse, it is a bit like a double click mouse but on a keyboard key.
Once you are comfortable to move around the scene it is already a good thing to take for granted.I advise you to train by visiting the scenes of a mod you like that will allow you to see the scenes from another angle.
Tip: to navigate the scene you can also move with "selected objects" by double clicking on the names of an object in the window to find yourself centered ont it into the scene.
Exercise have fun to cross the scene as quickly as possible
Warband Scene Editor Manual for Noobs
You mainly have in the useful modes: EDIT OBJECT, GROUND ELEVATE, GROUND TEXTURE PAINT and AI MESH. You can bypass on the rest for now, do not ask yourself too many questions about optional things or things you don't really need to know for the moment.
The EDIT OBJECT mode
This is the mode that allows you to select from the list pieces of 3D models that are called props and to place/move them in the scene.
It also allows you to add other elements, but for now we don’t care, we won’t confuse you with things not useful for the moment that you will learn later.
In ADD OBJECT mode
Click on "add object" and point the cursor on the scene and you will see the props appear, you can scroll them: it is a preselection, once you have the props you want: you click the right mouse button into the scene vue and the props will be created in the scene!
As long as the "add object" button remains pressed you are always in this mode of preselection of the props with the scrolling, you can choose others and put them in the scene with other right clicks. Once you had everything you wanted, click on "add object" to exit this mode.
Select and move/place props
Now that you know how to move around the scene you will be able to move to what is the base of the scening: put props togethers and place them on the ground like some Legos.
Select one or more props:
To select a prop you pass the cursor on it and once it is highlighted green: right click to select it and it is being highlighted yellow now: it is selected. For several props it is almost the same thing but after the first selection it is necessary to hold ctrl+ right click to select the following props.
To deselect one or more props: you click outside somewhere in the scene in a zone without props, if you right click on a props this will select the props and you will lose all the selections made before with yours ctrl + right click.
Tip: you can also select several props press by keeping pushing crtl and then just right click on props one after one.
You will see that you will often click ctrl + right click too fast and just right click not synchro with crtl and then deselect everything.
Exercise Practice slowly selecting several props once you know how to do it slowly you will know how to do it quickly later, with the experience.
Move/place one or more props:
Here’s how to move everything so that the props are well connected.
Select one or several props but tor learn one will suffice, but just know it: you can move several props same time too.
Push and hold the key (+mouse) G to move the props in the scene
T to move it on the Z axis: getting high or low
U + mouse to turn it on itself
X to reverse it on its own on the x-axis
Y to reverse it on its own on the y-axis
Z mouse to reverse it on its own on the Z-axis
Finally if you got confused in your prop movement, return to the basic placement press R
Exercise Try to make lines of walls well join.
To delete objects you can select them and press the key "Del" or use the "selected object" window and press "Del" also. Tip: you can select an entire objects list in this window (keeping the left click and going down) and move them/displace them like one prop or delete all the selection of objects at once also with key "Del".
The EDIT MODE is an extremely important part of scenes creation.
GROUND ELEVATE
You will have understood this mode is to modify the terrain, create your ground, shape the relief, make hills or rivers etc... !
This mode is quite intuitive, so i don’t want to spread out to much blah blah on it.
You set with the cursors the power of the effects and you right click on the scene field terrain to apply the thing.
You can just click or keep pushing your right click to apply the effect more and longer.
This mode is not hard to understand but hard to integrate. Just requires quite much practice.
I advise you to put the cursors of weight and hardness at different levels and test the combos in the field to see what it feels like.
Exercise make beautiful hills, or steep relief, mountains
GROUND TEXTURE PAINT
This mode is to apply textures to your scene, put grass, pavements, paths...
As with the previous mode, this mode is easy to understand but harder to integrate and master.
The operation is somewhat the same with the sliders to set the power of the effects.
The important thing for textures is trying to make realistic borders and transitions between the different zones therefore not to put the cursor to full that your textures gives a too sharp effect and borders not realistic.
There is nothing really complicated that i should explain, it is by practicing that you will master it.
Exercise making roads on a plain of grass or snow by trying to do something realistic with smooth transitions between the different textures.
Once you master the basics of these four elements you can create the scenery of a scene, now you have to create a grid that will allow the AI to move the NPC on it: the AI mesh!!
AI MESH
The AI mesh looks very boring but you have to see it as a Zen discipline, and it will already be less cumbersome with its few explanations:
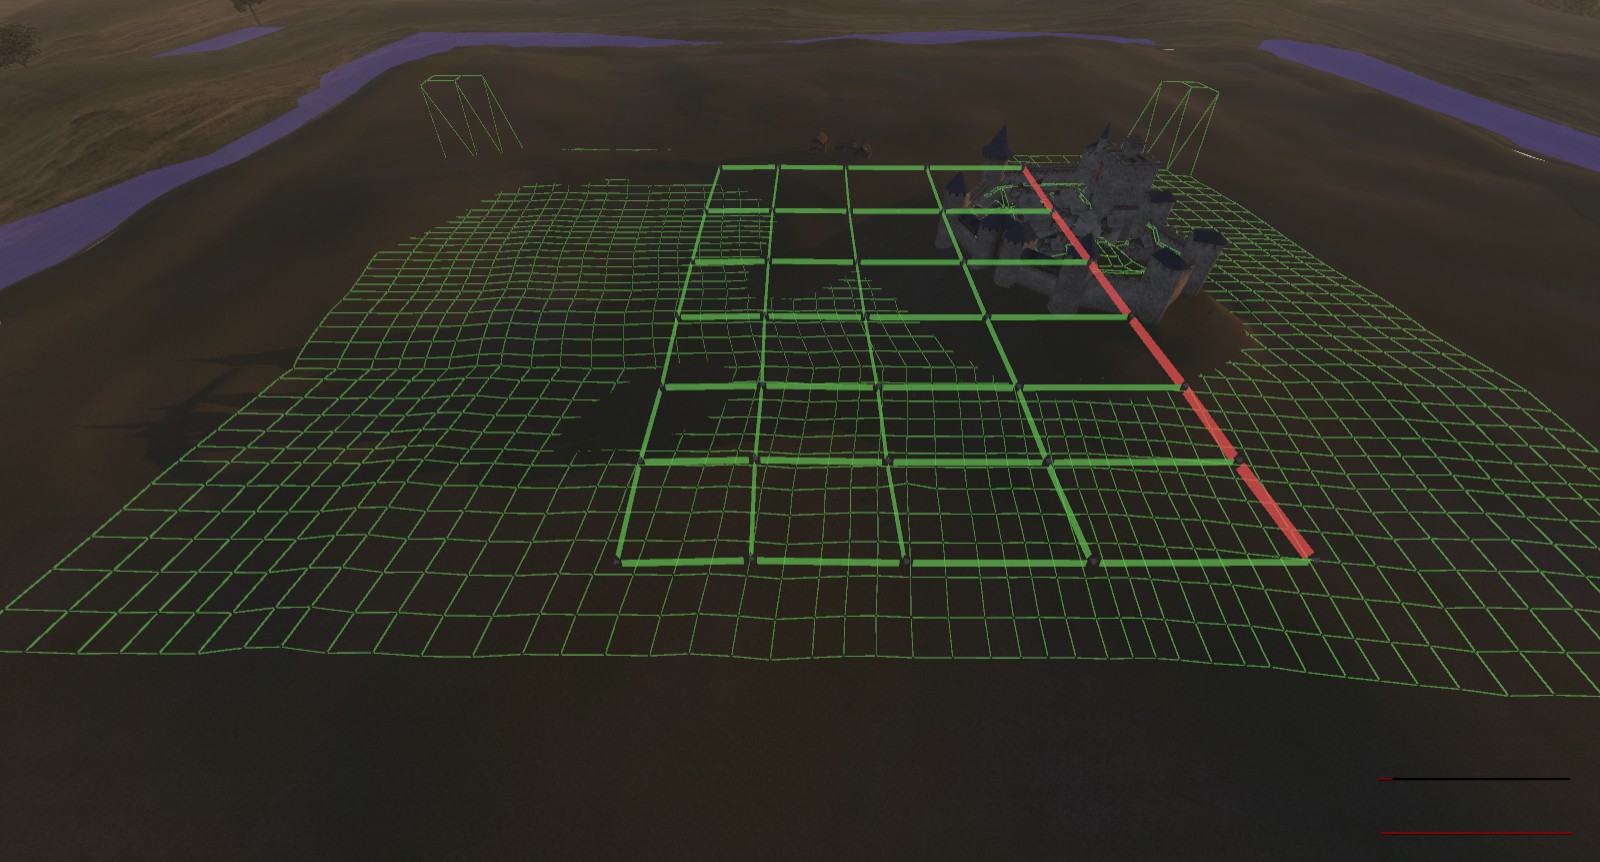
What is making an AI mesh ? To simply summarize it is making a giant grid (a smart mesh) on all places where NPC displace themselves.
The best thing is not to start thinking i’m going to do it, let's do this ! !! I’m going to do this AI mesh, without knowing where we’re going .
I STRONGLY advise you to first take a look at scenes that others and great sceners did like the scenes of InVain, The Bowman, Akhatir or the scenes of natives. Enter the AI mesh mode of those scenes observe the positions of points and grids: see how it’s structured.
If you not sure what you're doing, use those scenes as reference and copy what they did, how they place the AI mesh and structure it.
Important tip: use Ctrl + f11 to freeze NPCs because editing the AI mesh while NPCs are moving can cause crashes very often!
If you have worked well the placement/displacement of the props, well for the AI mesh they are the same commands to displace and move the points (vertex) or the edges or faces.
One of the most useful tricks for making AI mesh is joining mesh vertex. You select two close points (as for the props: right click to select a vertex and then Ctrl + right click for the extra selections) and click on "WELD": here you have attached two vertex!
The other most useful thing is extruding edges: you click Edge, select an edge and click extrude. Then you diplace with same commands as before to make squares most of the times.
For now this video of the excellent Fladin can enlighten you on what is concretely doing an AI mesh (sorry for suicidal music but this is probably the mindset of many peoples when they start doing AI mesh)
The overall logic is just make AI mesh more dense in important areas, aeras with many obstacles, or where terrain has lots of relief, this allow you to make your AI mesh more detailed and fitting more the terrain. In aeras with flat terrain and no major obstacles you can make wider squares/faces of AI mesh. Just think of this: nothing of AI mesh should go under terrain or through props. Inspire yourself from other scenes.
Now it’s just a matter of basically spending hours covering the areas where NPC roam around! And learn to use the differents options of AI mesh mode.
AI will track the path in the mesh that has the least faces meaning it doesn't matter if the faces are larger, but rather how many there are between A and B. They can take very strange routes that way
Small note: there are often two types of scenes especially for cities: a scene of city and a scene of city's siege. You can use the same scenery for the city and the siege scene but the city's siege scene AI mesh will be different. Have this in mind when you start a scene: is it a normal scene of castles that makes normal scene and siege at the same time or is it a scene of city that will require two scenes.
For a siege scene you can decide to put AI mesh only on shock points of the ladders and siege tower, the ramparts and all the places where the battle takes place and just do nothing at the other places.
You can also decide first to do the normal city scene: to make a complete AI mesh and to copy and modify it for the scene of siege basically you will modify the AI mesh just in the places where you will put ladders or a tower of siege.
Create AI mesh button of scene editor will generate you automatically an AI mesh: sadly and i don't know why it will work well only on little size and average size scenes... so if you need to build a giant grid youself you can use this trick.
Useful trick to build a giant AI mesh grid
To build fast a plane AI mesh create a face extrude it until you have a long line of faces then extrude the other side edges many times and you will have a giant plane AI mesh grid pretty fast, in like a few minutes, then you can select it with faces and place it to the ground.
It is up to you to see which method suits you best and is the fastest. Chacun ses goûts !
ENTRY POINTS
Entry points are simply the spawn points of the NPC or player.
Once you have done the scenery and the Ai mesh you just have to place these entry points using ADD OBJECTS.
Select "entry points" from the drop-down menu (on the left of ADD OBJETCS), write a number for Var No: and click ADD OBJECTS then place your entry point on the scene with a right click: you have created a new entry point. Same commands as the props to move entry points and place them on your scene.
Here you have all the necessary information on entry points: Tutorial-scene-making-for-warband-videos-entry-points
or here Scene editing wiki tutorial
PASSAGE
Passage are red transparent walls that stand for doors and are stting the passages between exterior scene into interior scenes like castle halls or prison. The way to create them is very similar to entry points except you have to choose "passage" in the dropbox menu where you have also props and then you enter the desired number in the second line "Menu item No:" You then click on add object and right click one the scene to make it appear.

Test your scene
Use the cheatmenu to create an army faster and test your scene. Small tip: once you have finished your scene, test it by replacing an original scene with ladders if your new siege scene has ladders or in an original scene with siege towers if your new scene uses a siege tower. A scene with a siege tower will have an entry point 47 in addition for archers while scenes with ladders have 40-46 entry points for archers: if you put the entry point 47 in a ladder siege scene or forget the entry point 47 in a siege tower scene it will end bad, so take care with this.
Tricks to test your scene:
Use cheatmenu to test your scene.
Here all you have to know about how to enter and use Cheatmenu
Increase belfry speed to test your siege.
To increase speed of siege tower you have to go in script.txt file of your module (make a back up of this file to revert to normal then). In this file gor for "cf_siege_move_belfry". In this part, look for this serie of numbers "1224979098644774917 20 2123 3" and replace 20 by 1. Now your siege tower speed should be pretty impressive. You can "play" with this number to find the speed you want.
Epilogue
Here is a tutorial written in speed, a kind of emergency kit for noobs, which is far from exhaustive but will be there to support you when you feel bad in front of all these very long tutorials. I intend to improve it with mini videos and more explanations but you already have a very good base in a single text and in a single place!
If you want to read more about scenes: Creating a scene, generate a scene with worldmap terrain generator
Swyter's terrain generator: http://web.archive.org/web/20130723110254/http://mbcommands.ollclan.eu/terrain
Here the scenes size in reality when sliders to the max (with Swyter's generator): 500m square for a size of 2, 750m for 3, 1000m for 4, and 1020m for 5.
Swyter updated his terrain generator and with this last version it gives the real world size of your scene which is very handy, here's the link:Swyter's terrain generator last version
Tutorial with screenshots:
https://steamcommunity.com/sharedfiles/filedetails/?id=899371360
Text tutorials:
Scene editing wiki page
https://forums.taleworlds.com/index.php/topic,293206.0.html
https://forums.taleworlds.com/index.php/topic,344611.0.html
http://forums.taleworlds.com/index.php/topic,139214.0.html
https://forums.taleworlds.com/index.php/topic,311045.0.html
Mapper Tutorial by Eskalior
If you really really want to know more:
https://forums.taleworlds.com/index.php/topic,61126.0.html AI mesh (broken screens)
http://forums.taleworlds.com/index.php/topic,112508.0.html Quick scene choser; Multiplayer (broken screens)
http://bastionmaps.com/tutorial.html Mini videos tutorials in english for multiplayer maps (but can help to learn basics for singleplayer) by Zebaad.
A tutorial by a noob for noobs
[Intro] you can skip it if you want and go to
Well, you all probably once had a secret desire to do scenes but you didn’t understand it because it sounds nice but also same time very boring. And all these tutorials and videos are kind of boring too, and the few short good tutorials disappear for obscure reasons. One hour of youtube video to learn how to place three houses on the terrain WTF!! Unfortunately most of the sceners have learned like this, or i don’t know how, personally i've had a hard times when i started while it’s not so complicated... hence the writing of this speed tuto that will save you a lot of trouble.
With this tutorial we will go straight to the point, like become a scener in a few days/weeks of practice!
You become a scener the day you did a whole scene all alone ^^First we will spend all the blah blah on how to create a scene in the multiplayer with the Warband terrain generator it is really very boring for a noob and it is the subject of the beginning of a big famous video tutorial. When we just want to make a "castle", yes like when we were kids with our Legos ! The Legos manuals were very well explained. Everyone was able to build the model of the castle and the creation of scene in Warband (called also scening) is the same: if you explain it well, i think that anyone can become a scener, at least those who already managed to make their Lego castle when they were kids have their chances to achieve this.
First of all, simply check "Enable edit mode" in the Warband launch/config panel; you can also tick "Start windowed" if you need to consult tutorials same time as you scene. You start a game you play, you go to a scene and then the adventure begins...Entering/Exiting the Warband Scene Editor
Your character is in a scene: click on ctrl+E and there you are in the Warband scene editor!
How to get out the scene editor? Same ctrl+E
Take care not to save the changes so click on "discard changes" if you do not want to modify the scene: if you are just in tourist mode who just wants to visit the scenes. If you have moved a props by mistake because you are a big noob and you click save: your scene will be modify!
So you have understood most of the time you will click on save because most of the time when we go in a scene and we are a scener it is to modify scenes!
In summary: enter and exit the editor it is ctrl+E then you choose to save modifications you did (save) or not (discard changes)
Explore/navigate in a scene
I advise you simply to start learning to "explore" the scenes. How to navigate into the scene? Here are the controls!!!
To navigate into the scene the commands keys are (push and hold the key + mouse same time for directions: rotates the viewing angle)
W forward
S backward
D go to the right
A go to the left
Train yourself slowly to move, oh... This is already very slow ? It’s normal and don't worry there is a trick to speed up this move: to speed up the navigation it is necessary to double push and then hold the key and at the same time "pilot" with the mouse, it is a bit like a double click mouse but on a keyboard key.
Once you are comfortable to move around the scene it is already a good thing to take for granted.I advise you to train by visiting the scenes of a mod you like that will allow you to see the scenes from another angle.
Tip: to navigate the scene you can also move with "selected objects" by double clicking on the names of an object in the window to find yourself centered ont it into the scene.
Exercise have fun to cross the scene as quickly as possible
Warband Scene Editor Manual for Noobs
You mainly have in the useful modes: EDIT OBJECT, GROUND ELEVATE, GROUND TEXTURE PAINT and AI MESH. You can bypass on the rest for now, do not ask yourself too many questions about optional things or things you don't really need to know for the moment.
The EDIT OBJECT mode
This is the mode that allows you to select from the list pieces of 3D models that are called props and to place/move them in the scene.
It also allows you to add other elements, but for now we don’t care, we won’t confuse you with things not useful for the moment that you will learn later.
In ADD OBJECT mode
Click on "add object" and point the cursor on the scene and you will see the props appear, you can scroll them: it is a preselection, once you have the props you want: you click the right mouse button into the scene vue and the props will be created in the scene!
As long as the "add object" button remains pressed you are always in this mode of preselection of the props with the scrolling, you can choose others and put them in the scene with other right clicks. Once you had everything you wanted, click on "add object" to exit this mode.
Select and move/place props
Now that you know how to move around the scene you will be able to move to what is the base of the scening: put props togethers and place them on the ground like some Legos.
Select one or more props:
To select a prop you pass the cursor on it and once it is highlighted green: right click to select it and it is being highlighted yellow now: it is selected. For several props it is almost the same thing but after the first selection it is necessary to hold ctrl+ right click to select the following props.
To deselect one or more props: you click outside somewhere in the scene in a zone without props, if you right click on a props this will select the props and you will lose all the selections made before with yours ctrl + right click.
Tip: you can also select several props press by keeping pushing crtl and then just right click on props one after one.
You will see that you will often click ctrl + right click too fast and just right click not synchro with crtl and then deselect everything.
Exercise Practice slowly selecting several props once you know how to do it slowly you will know how to do it quickly later, with the experience.
Move/place one or more props:
Here’s how to move everything so that the props are well connected.
Select one or several props but tor learn one will suffice, but just know it: you can move several props same time too.
Push and hold the key (+mouse) G to move the props in the scene
T to move it on the Z axis: getting high or low
U + mouse to turn it on itself
X to reverse it on its own on the x-axis
Y to reverse it on its own on the y-axis
Z mouse to reverse it on its own on the Z-axis
Finally if you got confused in your prop movement, return to the basic placement press R
Exercise Try to make lines of walls well join.
To delete objects you can select them and press the key "Del" or use the "selected object" window and press "Del" also. Tip: you can select an entire objects list in this window (keeping the left click and going down) and move them/displace them like one prop or delete all the selection of objects at once also with key "Del".
The EDIT MODE is an extremely important part of scenes creation.
GROUND ELEVATE
You will have understood this mode is to modify the terrain, create your ground, shape the relief, make hills or rivers etc... !
This mode is quite intuitive, so i don’t want to spread out to much blah blah on it.
You set with the cursors the power of the effects and you right click on the scene field terrain to apply the thing.
You can just click or keep pushing your right click to apply the effect more and longer.
This mode is not hard to understand but hard to integrate. Just requires quite much practice.
I advise you to put the cursors of weight and hardness at different levels and test the combos in the field to see what it feels like.
Exercise make beautiful hills, or steep relief, mountains
GROUND TEXTURE PAINT
This mode is to apply textures to your scene, put grass, pavements, paths...
As with the previous mode, this mode is easy to understand but harder to integrate and master.
The operation is somewhat the same with the sliders to set the power of the effects.
The important thing for textures is trying to make realistic borders and transitions between the different zones therefore not to put the cursor to full that your textures gives a too sharp effect and borders not realistic.
There is nothing really complicated that i should explain, it is by practicing that you will master it.
Exercise making roads on a plain of grass or snow by trying to do something realistic with smooth transitions between the different textures.
Once you master the basics of these four elements you can create the scenery of a scene, now you have to create a grid that will allow the AI to move the NPC on it: the AI mesh!!
AI MESH
The AI mesh looks very boring but you have to see it as a Zen discipline, and it will already be less cumbersome with its few explanations:
What is making an AI mesh ? To simply summarize it is making a giant grid (a smart mesh) on all places where NPC displace themselves.
The best thing is not to start thinking i’m going to do it, let's do this ! !! I’m going to do this AI mesh
, without knowing where we’re going .I STRONGLY advise you to first take a look at scenes that others and great sceners did like the scenes of InVain, The Bowman, Akhatir or the scenes of natives. Enter the AI mesh mode of those scenes observe the positions of points and grids: see how it’s structured.
If you not sure what you're doing, use those scenes as reference and copy what they did, how they place the AI mesh and structure it.
Important tip: use Ctrl + f11 to freeze NPCs because editing the AI mesh while NPCs are moving can cause crashes very often!
If you have worked well the placement/displacement of the props, well for the AI mesh they are the same commands to displace and move the points (vertex) or the edges or faces.
One of the most useful tricks for making AI mesh is joining mesh vertex. You select two close points (as for the props: right click to select a vertex and then Ctrl + right click for the extra selections) and click on "WELD": here you have attached two vertex!
The other most useful thing is extruding edges: you click Edge, select an edge and click extrude. Then you diplace with same commands as before to make squares most of the times.
For now this video of the excellent Fladin can enlighten you on what is concretely doing an AI mesh (sorry for suicidal music but this is probably the mindset of many peoples when they start doing AI mesh)
The overall logic is just make AI mesh more dense in important areas, aeras with many obstacles, or where terrain has lots of relief, this allow you to make your AI mesh more detailed and fitting more the terrain. In aeras with flat terrain and no major obstacles you can make wider squares/faces of AI mesh. Just think of this: nothing of AI mesh should go under terrain or through props. Inspire yourself from other scenes.
Now it’s just a matter of basically spending hours covering the areas where NPC roam around! And learn to use the differents options of AI mesh mode.
AI will track the path in the mesh that has the least faces meaning it doesn't matter if the faces are larger, but rather how many there are between A and B. They can take very strange routes that way
Small note: there are often two types of scenes especially for cities: a scene of city and a scene of city's siege. You can use the same scenery for the city and the siege scene but the city's siege scene AI mesh will be different. Have this in mind when you start a scene: is it a normal scene of castles that makes normal scene and siege at the same time or is it a scene of city that will require two scenes.
For a siege scene you can decide to put AI mesh only on shock points of the ladders and siege tower, the ramparts and all the places where the battle takes place and just do nothing at the other places.
You can also decide first to do the normal city scene: to make a complete AI mesh and to copy and modify it for the scene of siege basically you will modify the AI mesh just in the places where you will put ladders or a tower of siege.
Create AI mesh button of scene editor will generate you automatically an AI mesh: sadly and i don't know why it will work well only on little size and average size scenes... so if you need to build a giant grid youself you can use this trick.
Useful trick to build a giant AI mesh grid
To build fast a plane AI mesh create a face extrude it until you have a long line of faces then extrude the other side edges many times and you will have a giant plane AI mesh grid pretty fast, in like a few minutes, then you can select it with faces and place it to the ground.
It is up to you to see which method suits you best and is the fastest. Chacun ses goûts !
ENTRY POINTS
Entry points are simply the spawn points of the NPC or player.
Once you have done the scenery and the Ai mesh you just have to place these entry points using ADD OBJECTS.
Select "entry points" from the drop-down menu (on the left of ADD OBJETCS), write a number for Var No: and click ADD OBJECTS then place your entry point on the scene with a right click: you have created a new entry point. Same commands as the props to move entry points and place them on your scene.
Here you have all the necessary information on entry points: Tutorial-scene-making-for-warband-videos-entry-points
or here Scene editing wiki tutorial
PASSAGE
Passage are red transparent walls that stand for doors and are stting the passages between exterior scene into interior scenes like castle halls or prison. The way to create them is very similar to entry points except you have to choose "passage" in the dropbox menu where you have also props and then you enter the desired number in the second line "Menu item No:" You then click on add object and right click one the scene to make it appear.
Test your scene
Use the cheatmenu to create an army faster and test your scene. Small tip: once you have finished your scene, test it by replacing an original scene with ladders if your new siege scene has ladders or in an original scene with siege towers if your new scene uses a siege tower. A scene with a siege tower will have an entry point 47 in addition for archers while scenes with ladders have 40-46 entry points for archers: if you put the entry point 47 in a ladder siege scene or forget the entry point 47 in a siege tower scene it will end bad, so take care with this.
Tricks to test your scene:
Use cheatmenu to test your scene.
Here all you have to know about how to enter and use Cheatmenu
Increase belfry speed to test your siege.
To increase speed of siege tower you have to go in script.txt file of your module (make a back up of this file to revert to normal then). In this file gor for "cf_siege_move_belfry". In this part, look for this serie of numbers "1224979098644774917 20 2123 3" and replace 20 by 1. Now your siege tower speed should be pretty impressive. You can "play" with this number to find the speed you want.
Epilogue
Here is a tutorial written in speed, a kind of emergency kit for noobs, which is far from exhaustive but will be there to support you when you feel bad in front of all these very long tutorials. I intend to improve it with mini videos and more explanations but you already have a very good base in a single text and in a single place!
If you want to read more about scenes: Creating a scene, generate a scene with worldmap terrain generator
Swyter's terrain generator: http://web.archive.org/web/20130723110254/http://mbcommands.ollclan.eu/terrain
Here the scenes size in reality when sliders to the max (with Swyter's generator): 500m square for a size of 2, 750m for 3, 1000m for 4, and 1020m for 5.
Swyter updated his terrain generator and with this last version it gives the real world size of your scene which is very handy, here's the link:Swyter's terrain generator last version
Tutorial with screenshots:
https://steamcommunity.com/sharedfiles/filedetails/?id=899371360
Text tutorials:
Scene editing wiki page
https://forums.taleworlds.com/index.php/topic,293206.0.html
https://forums.taleworlds.com/index.php/topic,344611.0.html
http://forums.taleworlds.com/index.php/topic,139214.0.html
https://forums.taleworlds.com/index.php/topic,311045.0.html
Mapper Tutorial by Eskalior
If you really really want to know more:
https://forums.taleworlds.com/index.php/topic,61126.0.html AI mesh (broken screens)
http://forums.taleworlds.com/index.php/topic,112508.0.html Quick scene choser; Multiplayer (broken screens)
http://bastionmaps.com/tutorial.html Mini videos tutorials in english for multiplayer maps (but can help to learn basics for singleplayer) by Zebaad.
Last edited: