Yldrania
Regular

This tutorial will show, how to create and add new banners to the game. That could be interesting for people who don't have that much experience with the game, but would still love to create their custom stuff for an own mod or just to modify and personalize their native experience a bit.
We will create this tutorial in a way that everybody will be able to follow the steps and create good, custom banners. That includes that all the software used is freeware and I will put download links in the tutorial for easy access.
Programs And Tools:
Before starting, we need to download the required software.
- Paint.net: http://www.getpaint.net/download.html
Download any version suitable for your system.

First of all, we will learn how to change the color of the banner without losing the texture on it.
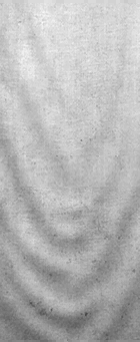
You can simply download the empty banner here or save the image on this tutorial.
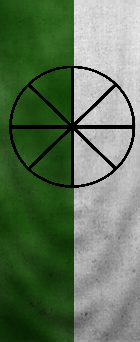
Once you have it, open it in Paint.Net. We now have the banner open and ready to edit. What we want to do now, is change the color of a part of the banner. Let's assume we want to color the left side green, while the right side of the banner remains white. For that, look at the Toolbar - it usually "spawns" on the left side of the screen by default. If that is not the case, you can use the bar on top, click on "Window\" and enable the first option you get there: Tools. On that little toolbar, choose the square on top right: Rectangle Select. Using that tool, mark the outline of the part of the banner you want to be green. Now select green as the main color on the color panel. For the next step we again need to use the top bar. Go to "Effects" -> "Render" -> "Clouds". A new window should open. Within that new window, find the "Blend Mode", which should by default be set on Normal. We don't want it on normal for this, so we just select "Multiply" instead. Now simply click "OK". Repeat the same process by going to "Effects" -> "Repeat Clouds" until the banner has the color as strong as you want it. Usually three times should do it. Your banner is now colored the way you want it to be.

Second, we will now learn how to create own symbols. You can just use Google and find some symbols that you like, or visit websites for free images. However, if you want to be completely sure to avoid copyright issues, you are better off creating at least some of it yourself. We are going to create the image shown here. For that, open a new window in Paint.Net, simply by using the top bar, "File" -> "New". Now, use the Toolbar we used before, select the Magic Wand, and left click on the white background. Now hit the Delete button on your keyboard. That removes the white background from your banner, which will be important for adding it to the banner without the unwanted white image background. We are now ready to start creating the image itself. Select the color black on your color panel, and choose the tool Ellipse. On top, below the menu bar we usually use, you can edit the Brush width. In this case, set it to 10. You can now simply create a black circle on the background. It might take you a couple of attempts to get it prefectly round. Now, again on the toolbar, choose Line / Curve. Start on the top middle of your circle line, and drag the line down to the bottom middle. Repeat the same process from the left to the right, and the two diagonal directions as shown on the image above. Again, it might take you a couple of tries to get it into the exact spots, however, it is worth the time.

Yes, I know. This banner is nothing spectacular, some may not even like it at all. However, it is a good example and only serves tutorial purposes, so please don't go off ranting about this banner .
.
Third, we will now continue to add the symbol we created onto the banner. First of all, select the entire symbol you created, and press Ctrl + C to copy it. It is now time to put the two files together. For that we need to go back to the the banner we colored before. In the Layer-Box, which should be placed in the bottom right of your screen by default, choose "Add New Layer". The next thing you do is press Crtl + V to paste the symbol into the new layer. Adjust the size and place the image where you want it. When you are done, again in the layer box, click on "Merge Layer Down" in order to combine the two layers you have worked with so far.
We are now done making our banner, and can proceed to adding it to the game. That, in fact, is quite simple. Go to your Program Files and click on Mount&Blade Warband. Within this folder, you should be able to see another folder called "Textures". Go there, and look for files called "banners_a.dds", "banners_b.dds", "banners_c.dds", "banners_d.dds", "banners_e.dds", "banners_f.dds" and "banners_g.dds", select them and press Ctrl + C to copy it. Make sure you don't press Ctrl + X and remove it from the original game. Now go back to the Mount&Blade Warband folder you have been in before, and select the folder "Modules". Here, go into the folder of your module, and again choose the "Textures" folder, where you press Ctrl + V to paste the .DDS files you copied before. You can open .DDS files with Paint.Net! That is important, because that will be your next step. Open the first of the files, and copy paste your previously made banner onto it. Make sure it is in the right position, otherwise it will not be correctly displayed ingame. The banner will take the position of the one you overwrite. You can overwrite every single banner in the files.
It is easy to test whether you did it correctly. For that you simply start the game (remember to restart it after every change you made, and to select the correct module), go to Multiplayer, and edit your character. You automatically have to choose a banner, and you will be able to see where you added your banner and whether it is displayed correctly.
We will create this tutorial in a way that everybody will be able to follow the steps and create good, custom banners. That includes that all the software used is freeware and I will put download links in the tutorial for easy access.
Programs And Tools:
Before starting, we need to download the required software.
- Paint.net: http://www.getpaint.net/download.html
Download any version suitable for your system.

First of all, we will learn how to change the color of the banner without losing the texture on it.
You can simply download the empty banner here or save the image on this tutorial.
Once you have it, open it in Paint.Net. We now have the banner open and ready to edit. What we want to do now, is change the color of a part of the banner. Let's assume we want to color the left side green, while the right side of the banner remains white. For that, look at the Toolbar - it usually "spawns" on the left side of the screen by default. If that is not the case, you can use the bar on top, click on "Window\" and enable the first option you get there: Tools. On that little toolbar, choose the square on top right: Rectangle Select. Using that tool, mark the outline of the part of the banner you want to be green. Now select green as the main color on the color panel. For the next step we again need to use the top bar. Go to "Effects" -> "Render" -> "Clouds". A new window should open. Within that new window, find the "Blend Mode", which should by default be set on Normal. We don't want it on normal for this, so we just select "Multiply" instead. Now simply click "OK". Repeat the same process by going to "Effects" -> "Repeat Clouds" until the banner has the color as strong as you want it. Usually three times should do it. Your banner is now colored the way you want it to be.

Second, we will now learn how to create own symbols. You can just use Google and find some symbols that you like, or visit websites for free images. However, if you want to be completely sure to avoid copyright issues, you are better off creating at least some of it yourself. We are going to create the image shown here. For that, open a new window in Paint.Net, simply by using the top bar, "File" -> "New". Now, use the Toolbar we used before, select the Magic Wand, and left click on the white background. Now hit the Delete button on your keyboard. That removes the white background from your banner, which will be important for adding it to the banner without the unwanted white image background. We are now ready to start creating the image itself. Select the color black on your color panel, and choose the tool Ellipse. On top, below the menu bar we usually use, you can edit the Brush width. In this case, set it to 10. You can now simply create a black circle on the background. It might take you a couple of attempts to get it prefectly round. Now, again on the toolbar, choose Line / Curve. Start on the top middle of your circle line, and drag the line down to the bottom middle. Repeat the same process from the left to the right, and the two diagonal directions as shown on the image above. Again, it might take you a couple of tries to get it into the exact spots, however, it is worth the time.

Yes, I know. This banner is nothing spectacular, some may not even like it at all. However, it is a good example and only serves tutorial purposes, so please don't go off ranting about this banner
Third, we will now continue to add the symbol we created onto the banner. First of all, select the entire symbol you created, and press Ctrl + C to copy it. It is now time to put the two files together. For that we need to go back to the the banner we colored before. In the Layer-Box, which should be placed in the bottom right of your screen by default, choose "Add New Layer". The next thing you do is press Crtl + V to paste the symbol into the new layer. Adjust the size and place the image where you want it. When you are done, again in the layer box, click on "Merge Layer Down" in order to combine the two layers you have worked with so far.
We are now done making our banner, and can proceed to adding it to the game. That, in fact, is quite simple. Go to your Program Files and click on Mount&Blade Warband. Within this folder, you should be able to see another folder called "Textures". Go there, and look for files called "banners_a.dds", "banners_b.dds", "banners_c.dds", "banners_d.dds", "banners_e.dds", "banners_f.dds" and "banners_g.dds", select them and press Ctrl + C to copy it. Make sure you don't press Ctrl + X and remove it from the original game. Now go back to the Mount&Blade Warband folder you have been in before, and select the folder "Modules". Here, go into the folder of your module, and again choose the "Textures" folder, where you press Ctrl + V to paste the .DDS files you copied before. You can open .DDS files with Paint.Net! That is important, because that will be your next step. Open the first of the files, and copy paste your previously made banner onto it. Make sure it is in the right position, otherwise it will not be correctly displayed ingame. The banner will take the position of the one you overwrite. You can overwrite every single banner in the files.
It is easy to test whether you did it correctly. For that you simply start the game (remember to restart it after every change you made, and to select the correct module), go to Multiplayer, and edit your character. You automatically have to choose a banner, and you will be able to see where you added your banner and whether it is displayed correctly.


