


I've written a lot of generalized tutorial / hint stuff for this mod, as the gameplay difficulty curve, especially on Mommy, can be a bit intimidating for new players. This is a guide written for the average player who is new to the mod. The guidelines and ideas you learn here will be even more useful on the Normal and Casual Gamer levels of difficulty, of course.
Since I'm going to have to be relatively inactive for a while, but would like to keep in touch with people about how they're playing (and hopefully enjoying) the mod, I thought that maybe it would be fun to write some basic, "how to get started" guides for each character type. As the developer, I've played every class fairly extensively, so I know a lot of little tricks.
This doesn't mean that I know everything, of course- the mod's gotten so big and complex, and there are so many choices, that that is effectively impossible. But I've probably started more new characters than anybody else has, and I'm a fairly skilled player. If anybody else would like to write guides like this, I will include them on the sub-forum like this. Please try to use one this as a guideline for style and content.
The Mercenary Archer
The Mercenary Archer is a "Hollywood" character class, which is to say that it is deliberately unrealistic and overpowered in a limited way. The archer starts with the best bow in the game (and it cannot be bought- it's inherited with the class) and a level of skill at archery that would be impractical for other players to reach in the course of a normal game.
This class is for everybody who liked Legolas in the Lord of the Rings movies. In the real world, archery is pretty difficult, and you can't shoot 20 arrows and expect to kill 20 foes. The Archer can and will do this, in the right hands. Over time, this class can become a powerful and effective battlefield support character, and with a good build, you can make a very powerful army with the Archer. I think it's fun to play this class, as it has a moderately-difficult start on Mommy difficulty, but is medium difficulty once you've gotten past the start.
Bonuses and Perks
The Archer gets the best bow in the game. Combined with a reasonable score in Combat Training and Heroism, the Archer is quite capable of killing anything in the game with one shot, even into late game. This unique ability, combined with the rate of fire, makes the Archer an exceptionally powerful support character, able to do massive damage to enemy infantry formations or during sieges.
The Archer gets to hire a wider range of mercenaries than some of the other classes. This gives them more options; they can buy cheap troops with a variety of abilities, or invest in Faction troops that are generally much more powerful once they've leveled up, but take considerable time to both hire and polish.
The Archer is neutral, in terms of income from holdings, and gets a small bonus towards troop wages.
The Archer has a slightly-positive relationship with the Lords, and may enter into all of the normal arrangements with Lords, including becoming a vassal.
Special Note: Becoming good at archery.
A lot of people find archery in this mod to be even more difficult than it was in Warband. This is not a bug; IRL, archers have to aim, draw and loose an arrow in one smooth motion to achieve accuracy and avoid fatigue, and it's simulated in the mod fairly accurately. So to become really proficient with this class usually requires some practice.
The technique for firing is fairly straightforward, but requires practice to master. First, select a target. This is your target; keep the recticle centered on it. Click the fire button, and while continuing to keep the recticle centered, release it immediately. This means that, approximately half a second later, the bow will be released. During this period, you just keep aiming. That's all there is to it- easy to do, difficult to master. But when you do master the technique, you will be able to fire almost two shots per second, and each one can kill (almost) anything in the game.
In addition, the Archer's ability to spam arrows has another major use; in a supporting role, you can defend infantry lines from incoming cavalry. Shoot the horses- they're big targets, but they're usually more vulnerable than the riders, especially when we're talking about armored horses. A high-end Archer with Heroism bonuses and a high crit rate from Combat Training can expect to kill heavy warhorses with a couple of shots; that may not sound like a big deal, but when it's some Rhodok Condotierri trying to run over your infantry lines, you'll appreciate having that ability, I promise
Class-Specific Tactics and Hints
Firstly, carry at least two quivers full of arrows, because, especially when firing from horseback, you will miss fairly frequently. 100 arrows can mean 100 kills, but more realistic rates are 40-50.
Secondly, aim at masses of enemy troops whenever possible. It's much harder to miss a crowd than an individual- if you're dealing with scattered troops, kill them with a hand weapon.
Lastly, the Archer is a very slot-limited class, so you're going to want to buy a really nice two-handed weapon as soon as possible. Even if you're excellent at manual blocking, you'll usually find that the reach and assured killing power is more useful than speed. The other alternative, introduced in 1.19, is to equip that last slot with Hand Grenades. This gives you 6 explosive attacks that can knock down a group of foes and keep them away from you while you flee melee. But you only get 6 shots, and after that, you're going to be reduced to fisticuffs, so it's risky.
Tactically, you want to avoid being on foot with this character; the Archer is a character that excels in a mounted role, but is generally unsuited for hand-to-hand. When it cannot be avoided (usually because your horse has died), you want to walk backwards and kill enemies that get within the swing radius of your weapon, not attempt to close. While the Archer can eventually wear the same high-end armors as other classes, you probably won't ever reach the same level of survivability that you will with them, due to spending points on army bonuses, so it's usually better to forgo the very heaviest armors until you're in the later part of a game, so that if you're on foot, you can run away from hand-to-hand combat. This isn't being a wimp; it's being prudent. The Archer's a support class, and it's not intended to be used as a primary fighter.
Suggested Stat Start
This class is flexible, but lacks Pathfinding. I suggest putting points into Pathfinding, Prisoner Management, Horse Archery and Riding. This class has a fairly high starting AGI, so an investment in a point or two of Reflexes may be a good idea as well. Don't sink points into STR yet; you can't afford armor that weighs more than what you're wearing.
Starting Off
The Mercenary Archer gets a really prime perk as a starting character. You start with a small band of like-minded people who are already in your band. These are low-level archers, and not particularly hardy, but they're a lot better than nothing, and they're free, at least until the first payday.
During the first fight, you have only one real objective: not to get those precious troops killed. Tell them Hold Position, then go kill the outlaw yourself. If that means you get knocked unconscious, so be it- it's better than losing the first troops.
Once you have finished the Alley encounter, take the 'find the merchant's brother' job. The money doesn't have to be repaid; technically, that job doesn't have to be completed, ever. But completing it and having two fights along the way will put you on the path to financial success.
If any Companions are available in your starting town, pick them up. With the initial money from the Merchant, you should be able to afford it. Don't bother hiring any mercenaries at this time.
Now leave and immediately take out the 4 thieves. This fight will either gain you or your Companions their first level, so it's useful.
Presuming that neither you nor your Companion have been knocked out, go to the Hideout immediately. Avoid getting into fights along the way.
Once at the Hideout, proceed prudently. Like the Alley sequence, your primary goal is to not lose any troops. However, you must stay alive, so I usually have everybody Follow Me, then plant them in a place where they have line of sight on the places that the Looters spawn. Typically, you can get through this fight without losing more than one of your troops.
Once you have finished this fight and taken the loot, head back towards your starting town, but look for any parties of Looters that are nearby. On Mommy difficulty, there are special parties of Looters spawned only at the beginning of the game that have less than 50 troops, and are fairly weak. Find one and start a fight.
50 vs. 7-9 people may sound like madness, but it's not. The Looters are very weak, have practically no armor, and crummy weapons. If you have a Companion who's decent in mounted combat, then you can probably both run them over with your horses and pepper them with arrows, killing most of them before they get anywhere near your archers. These weak parties of Looters won't last long, but they're basically free gold and levels when you know what you're doing. And this is the only time you need to make it work. Save your game before entering this fight, unless you're so hardcore that you've turned Realistic Saves on (in which case, you don't need this guide, lol) and play it out until you've won it comfortably. Don't worry, though- the odds sound bad, but the fight's not too hard.
Now return to the Merchant and get your reward. At this point, you haven't spent any money, so even if a Ransom Broker isn't around, you can sell your prisoners by talking to the Barkeeper, who will charge a small fee.
Depending on whether you took Prisoner Management or not, you have anywhere from 2500 to 4500 gold in your possession. By ordinary Warband standards, you're rich! In Blood and Steel, that's just petty cash. But it's enough to hire some decent troops.
Expanding Your Army
Now that you have some cash on hand, you need to pick your starting forces. As an Archer, you have a very wide selection to choose from. I cannot possibly cover all of the available choices or the philosophy behind them, and there are a lot of valid early builds, but when I play this class, I usually recruit some "scum" from the Tavern, or (if starting in Praven) I pick up Royal Huntsmen, if they're available.
Why pick up the scruffy scum troops? One, they're usually irregulars. This means that they often have missile weapons, including gunpowder weapons. This is a good equalizer during early battles. Two, they're cheap and I don't cry if they die in job lots while I'm leveling myself and my Companions, so long as we don't all get killed. This is pretty callous, but hey, they're scum-dog mercenaries who'd be burning somebody's barn down if they weren't cutting throats for me, so I don't feel too bad. And some of these guys are eventually going to become fairly valuable, as they level.
Basically, though, I go for missile troops immediately. This allows me and my Companions to act as cavalry and support, while my troops maintain a line and hopefully aren't killed.
Here is my Mercenary Archer character, entering Early Game:
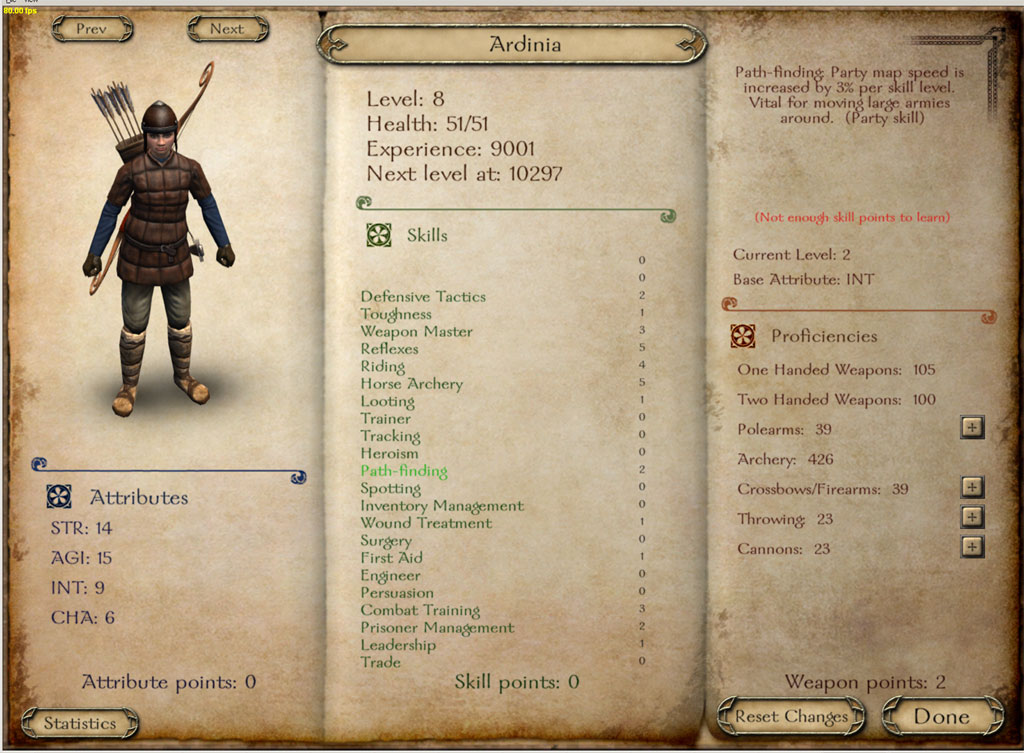
Early Game
Now it's time to enter the early game. There are lots of valid choices here. For example, if you talk to the Guild Master, he'll probably have work for you to do that will pay a reasonable fee, and if you fight and win a battle along the way, even better.
But I usually don't bother. Usually, I go find some more of the weak parties of Looters and take them out. Again, remember- they'll get killed by Lords, Manhunters and Caravans. They're a diminishing resource, so you may as well harvest the ones you can find, before they're gone.
As you kill off these parties, assuming that you don't lose these battles (which you should not) and gain around 10 levels or so, you'll want to begin to get serious about your long-term build.
Archers are a flexible class, build-wise, but in the late game, you're going to want to put as much as possible into both INT and CHR party-based skills, especially Pathfinding, Defensive Tactics and Heroism. The last two are very important combat skills- they make your troops take less damage, while dealing more in return. This makes a very large difference in the relative power of armies, as you get into the later game. However, during this early phase, you need to buy enough points in STR to wear armor that will give you a chance to survive hits from gunpowder weapons. I'd suggest aiming for 14-15 STR early on.
Your next major choice is whether to serve as a mercenary for the Lords, or even become a Vassal. This is a risky choice, as you will most likely want to strike out on your own later on, but it can pay off early by allowing you to get free support in battles and some good loot. Usually I remain independent with this class, so that the penalties for starting my own empire later are as low as possible, but I help Lords out whenever possible, to raise my Relationships with them.
You want to wander around, picking up as many Companions as possible, as early as possible. Developed early, your Companions can make your core army extremely powerful by late game, and bring many valuable skills with them. Leveling Companions is usually pretty easy; I suggest giving them missile weapons and only mounting the ones that have stats that make them effective hand-to-hand fighters from the start. You can turn even the weakest Companions into fairly formidable warriors over time, but some are best kept as support troops, out of the thick of the fighting, and I never use any of them as line infantry- due to the nature of combat in this mod, you will find that even the best Companions are weaker in that role than the higher-quality mercenaries and powerful Faction troops. But using Companions means that you don't need any cavalry during early game, and you'll find that they gradually improve the quality of your army a lot. So picking them up early is a must.
Early on, don't pick fights with any of the bandits that aren't Looters or Scum. The other bandit groups tend to have a lot of cavalry, and can be exceedingly dangerous- or, in the case of the Sea Raiders, they are formidable infantry with strong archer support. You can't defeat these forces with early armies without taking large losses, and the Archer can't afford to put a lot of points into Surgery, either. Picking up Jeremus to help in that regard is very useful, but won't entirely keep you from eating up your finances. But after 5-6 fights, you'll have saved up enough money to start buying fairly decent troops in large enough numbers to be effective against most early threats.
My character, at the end of Early Game:
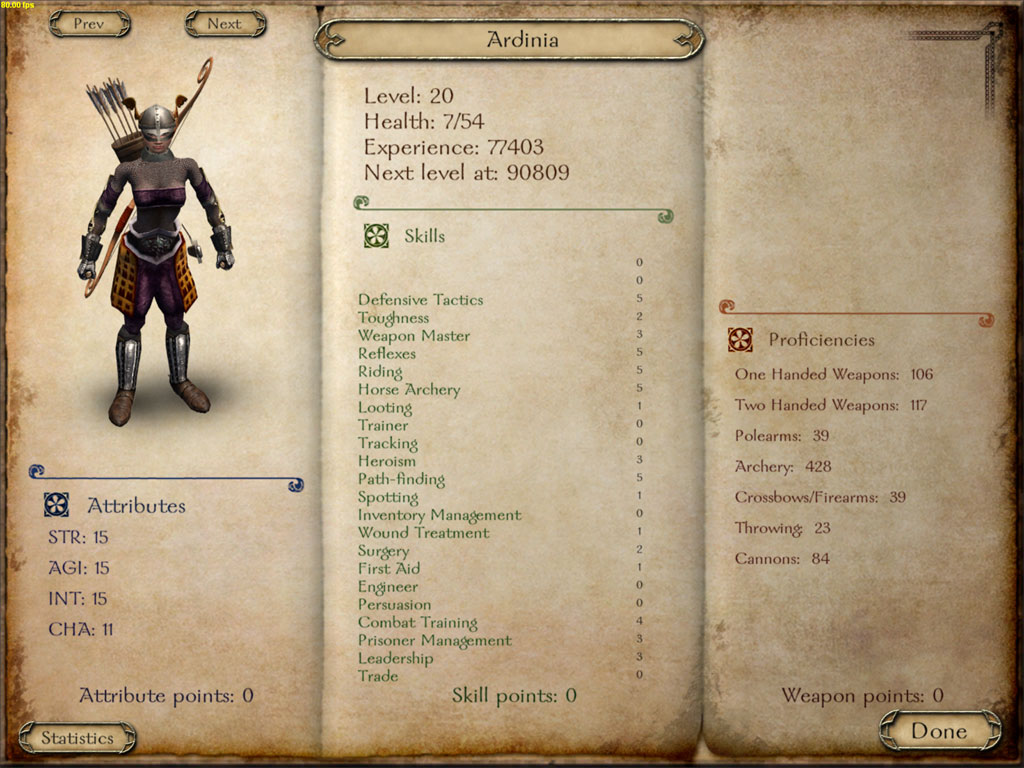
Middle Game
During middle game, you've arrived at the point where you and your core band are finally becoming competent. If you've put enough points into Heroism and Defensive Tactics, you will start to see lower and lower casualties during battles with ordinary bandits. It's time to broaden your scope and decide on your objectives for late game.
The classic way to play this mod out, at this point, is to either become a Vassal and help lead one of the Factions to total victory (boo, hiss), or to build towards becoming Emperor (yay). This is the major fork in that road.
At this point, you should be around level 20 or so. You have decent equipment; your Companions are no longer wearing cast-off armor, and your army is full of Elite troops, maybe a few Experts. Depending on how much you've used Faction troops, you may have some very powerful support troops in your army, like Sarranid Snipers, Khergit Rocketeers, or Swadian Handgonners. You probably have some nice infantry formations and a small amount of excellent cavalry. You are, in short, ready to take castles over, maybe even cities. Except for one problem; money.
While your personal finances are probably very good at this point, and you'll routinely have a balance of greater than 50K or higher, you need to get a secure source of income built to deal with the special problems of late-game play. By this point in the game, you're also nearing the point where the Death Knights show up, if you're playing on Mommy, and that adds to the problems.
Empires are expensive, but they can be made to pay for themselves, within reasonable limits. The key here is that you need to get a steady source of income going that will pay the ongoing expenses and keep you afloat through hard times, such as having to rebuild your army after a brutal battle with Faction troops or the Death Knights.
The best way to do this is to Invest it. Go to each city and speak to the Guild Master about this. Iron foundries and dye works offer the most reliable and highest payouts (as of 1.19- this will get reviewed and probably changed in 1.20, as it got left on the cutting-room floor for this version). While the payoff is long-term, it's worth buying as soon as you can afford to do it, because the long-term effects on your finances will be worth it. Between Investments and income from fiefs, your defensive forces can pretty much pay for themselves. That leaves you with just the expenses of maintaining your own army, which should remain manageable. You don't have to do this; pay from selling captives (the primary source of income in the mod) may sustain all of your costs indefinitely, if you don't lose any battles. If you're the type of player who saves before and after every fight, and re-fights any where you lose, then it's probably safe to play that way.
As you gather up the Investments, you can evaluate what's going on in the game's world around you, and, if you're going to form an empire, look for weakness in the kingdoms. By mid-game, one or more of the Factions will be in serious trouble, and will have lost several castles, or even a city. These are ideal targets, because they'll have fewer active Lords to defeat and they're probably preoccupied with fighting the other Faction or Factions.
In terms of stats, by mid-game you are probably done putting points into STR, and may not want to put further points into AGI, but buying more Reflexes is always a useful buff to have, since it can literally be a life-saver. Mainly, though, you want to put points into INT and CHR, and build up your army-support skills as much as possible, while putting a few points into ancillary skills. You want to have a Riding skill of 4 or better, for example, so that you can ride an armored horse- fighting Faction troops without one is impractical.
Late Game
At this point, the Archer should, ideally, have reached level 25-30. You should now have Companions who give you bonuses in Defensive Tactics and Heroism of at least 3 if not better, giving you a combined score of at least 9 if not higher. This is vital for your class, if you want to face the Faction armies and survive, let alone defeat the Death Knights.
At this point, you've pretty much finished the leveling treadmill, and should have an army of 250+ troops, most of whom are Elite or better, and costing up to 40,000 dinars per week, although it's usually less than that. You are ready to take on anything. Pick a weak spot in one of the Factions' holdings, and begin to take over Calradia.
Should you make your Companions Lords, when playing this class? Yes, with some qualifications. Usually, you'll want to retain at least 3-4 Companions who buff important skills you need, like Pathfinding, Surgery, Defensive Tactics, Heroism, Looting, Trainer and so forth. By this point in the game, if you've managed your Companions well, you will be spoilt for choice, in terms of who to make a Lord, but if not, you may want to level them further. Also bear in mind that each Companion fields different armies, and some are better than others in the role of a Lord. These are things you'll have to figure out as you play.
Should you keep your Lords with you a lot, or let them defend your territory? With this class, if you've played it correctly, you usually don't need a great deal of support- one or two Lords will provide you with plenty of troops, should you need massive numbers. Ideally, you want to face the Factions with around 1000 troops or more, so that you can fight them on terms that, when army skills and your tactical acumen are included, are something like even odds. But you can and will defeat Lord armies vastly larger than yours with a core force of 400 or so- it really depends on what your army composition looks like and the power of the enemy troops. Against some of the Factions, in particular the Vaegir and the Rhodoks, it's difficult to defeat them without building an army specifically geared to nullify their advantages, so keep that in mind.
Should you fight defensive battles to keep castles and cities? In general, no. This class can do a very fine job during castle defense, but the numbers you'll face on Mommy make it unlikely to succeed. It's usually better to stay on the offensive and force the enemy to besiege all the castles you've taken, while taking castles at a minimal cost with specialists and picking off small Lord forces whenever you can.
****************************************************************
I hope this guide is useful to people playing this class, and improves your understanding of the mod
Since I'm going to have to be relatively inactive for a while, but would like to keep in touch with people about how they're playing (and hopefully enjoying) the mod, I thought that maybe it would be fun to write some basic, "how to get started" guides for each character type. As the developer, I've played every class fairly extensively, so I know a lot of little tricks.
This doesn't mean that I know everything, of course- the mod's gotten so big and complex, and there are so many choices, that that is effectively impossible. But I've probably started more new characters than anybody else has, and I'm a fairly skilled player. If anybody else would like to write guides like this, I will include them on the sub-forum like this. Please try to use one this as a guideline for style and content.
The Mercenary Archer
The Mercenary Archer is a "Hollywood" character class, which is to say that it is deliberately unrealistic and overpowered in a limited way. The archer starts with the best bow in the game (and it cannot be bought- it's inherited with the class) and a level of skill at archery that would be impractical for other players to reach in the course of a normal game.
This class is for everybody who liked Legolas in the Lord of the Rings movies. In the real world, archery is pretty difficult, and you can't shoot 20 arrows and expect to kill 20 foes. The Archer can and will do this, in the right hands. Over time, this class can become a powerful and effective battlefield support character, and with a good build, you can make a very powerful army with the Archer. I think it's fun to play this class, as it has a moderately-difficult start on Mommy difficulty, but is medium difficulty once you've gotten past the start.
Bonuses and Perks
The Archer gets the best bow in the game. Combined with a reasonable score in Combat Training and Heroism, the Archer is quite capable of killing anything in the game with one shot, even into late game. This unique ability, combined with the rate of fire, makes the Archer an exceptionally powerful support character, able to do massive damage to enemy infantry formations or during sieges.
The Archer gets to hire a wider range of mercenaries than some of the other classes. This gives them more options; they can buy cheap troops with a variety of abilities, or invest in Faction troops that are generally much more powerful once they've leveled up, but take considerable time to both hire and polish.
The Archer is neutral, in terms of income from holdings, and gets a small bonus towards troop wages.
The Archer has a slightly-positive relationship with the Lords, and may enter into all of the normal arrangements with Lords, including becoming a vassal.
Special Note: Becoming good at archery.
A lot of people find archery in this mod to be even more difficult than it was in Warband. This is not a bug; IRL, archers have to aim, draw and loose an arrow in one smooth motion to achieve accuracy and avoid fatigue, and it's simulated in the mod fairly accurately. So to become really proficient with this class usually requires some practice.
The technique for firing is fairly straightforward, but requires practice to master. First, select a target. This is your target; keep the recticle centered on it. Click the fire button, and while continuing to keep the recticle centered, release it immediately. This means that, approximately half a second later, the bow will be released. During this period, you just keep aiming. That's all there is to it- easy to do, difficult to master. But when you do master the technique, you will be able to fire almost two shots per second, and each one can kill (almost) anything in the game.
In addition, the Archer's ability to spam arrows has another major use; in a supporting role, you can defend infantry lines from incoming cavalry. Shoot the horses- they're big targets, but they're usually more vulnerable than the riders, especially when we're talking about armored horses. A high-end Archer with Heroism bonuses and a high crit rate from Combat Training can expect to kill heavy warhorses with a couple of shots; that may not sound like a big deal, but when it's some Rhodok Condotierri trying to run over your infantry lines, you'll appreciate having that ability, I promise
Class-Specific Tactics and Hints
Firstly, carry at least two quivers full of arrows, because, especially when firing from horseback, you will miss fairly frequently. 100 arrows can mean 100 kills, but more realistic rates are 40-50.
Secondly, aim at masses of enemy troops whenever possible. It's much harder to miss a crowd than an individual- if you're dealing with scattered troops, kill them with a hand weapon.
Lastly, the Archer is a very slot-limited class, so you're going to want to buy a really nice two-handed weapon as soon as possible. Even if you're excellent at manual blocking, you'll usually find that the reach and assured killing power is more useful than speed. The other alternative, introduced in 1.19, is to equip that last slot with Hand Grenades. This gives you 6 explosive attacks that can knock down a group of foes and keep them away from you while you flee melee. But you only get 6 shots, and after that, you're going to be reduced to fisticuffs, so it's risky.
Tactically, you want to avoid being on foot with this character; the Archer is a character that excels in a mounted role, but is generally unsuited for hand-to-hand. When it cannot be avoided (usually because your horse has died), you want to walk backwards and kill enemies that get within the swing radius of your weapon, not attempt to close. While the Archer can eventually wear the same high-end armors as other classes, you probably won't ever reach the same level of survivability that you will with them, due to spending points on army bonuses, so it's usually better to forgo the very heaviest armors until you're in the later part of a game, so that if you're on foot, you can run away from hand-to-hand combat. This isn't being a wimp; it's being prudent. The Archer's a support class, and it's not intended to be used as a primary fighter.
Suggested Stat Start
This class is flexible, but lacks Pathfinding. I suggest putting points into Pathfinding, Prisoner Management, Horse Archery and Riding. This class has a fairly high starting AGI, so an investment in a point or two of Reflexes may be a good idea as well. Don't sink points into STR yet; you can't afford armor that weighs more than what you're wearing.
Starting Off
The Mercenary Archer gets a really prime perk as a starting character. You start with a small band of like-minded people who are already in your band. These are low-level archers, and not particularly hardy, but they're a lot better than nothing, and they're free, at least until the first payday.
During the first fight, you have only one real objective: not to get those precious troops killed. Tell them Hold Position, then go kill the outlaw yourself. If that means you get knocked unconscious, so be it- it's better than losing the first troops.
Once you have finished the Alley encounter, take the 'find the merchant's brother' job. The money doesn't have to be repaid; technically, that job doesn't have to be completed, ever. But completing it and having two fights along the way will put you on the path to financial success.
If any Companions are available in your starting town, pick them up. With the initial money from the Merchant, you should be able to afford it. Don't bother hiring any mercenaries at this time.
Now leave and immediately take out the 4 thieves. This fight will either gain you or your Companions their first level, so it's useful.
Presuming that neither you nor your Companion have been knocked out, go to the Hideout immediately. Avoid getting into fights along the way.
Once at the Hideout, proceed prudently. Like the Alley sequence, your primary goal is to not lose any troops. However, you must stay alive, so I usually have everybody Follow Me, then plant them in a place where they have line of sight on the places that the Looters spawn. Typically, you can get through this fight without losing more than one of your troops.
Once you have finished this fight and taken the loot, head back towards your starting town, but look for any parties of Looters that are nearby. On Mommy difficulty, there are special parties of Looters spawned only at the beginning of the game that have less than 50 troops, and are fairly weak. Find one and start a fight.
50 vs. 7-9 people may sound like madness, but it's not. The Looters are very weak, have practically no armor, and crummy weapons. If you have a Companion who's decent in mounted combat, then you can probably both run them over with your horses and pepper them with arrows, killing most of them before they get anywhere near your archers. These weak parties of Looters won't last long, but they're basically free gold and levels when you know what you're doing. And this is the only time you need to make it work. Save your game before entering this fight, unless you're so hardcore that you've turned Realistic Saves on (in which case, you don't need this guide, lol) and play it out until you've won it comfortably. Don't worry, though- the odds sound bad, but the fight's not too hard.
Now return to the Merchant and get your reward. At this point, you haven't spent any money, so even if a Ransom Broker isn't around, you can sell your prisoners by talking to the Barkeeper, who will charge a small fee.
Depending on whether you took Prisoner Management or not, you have anywhere from 2500 to 4500 gold in your possession. By ordinary Warband standards, you're rich! In Blood and Steel, that's just petty cash. But it's enough to hire some decent troops.
Expanding Your Army
Now that you have some cash on hand, you need to pick your starting forces. As an Archer, you have a very wide selection to choose from. I cannot possibly cover all of the available choices or the philosophy behind them, and there are a lot of valid early builds, but when I play this class, I usually recruit some "scum" from the Tavern, or (if starting in Praven) I pick up Royal Huntsmen, if they're available.
Why pick up the scruffy scum troops? One, they're usually irregulars. This means that they often have missile weapons, including gunpowder weapons. This is a good equalizer during early battles. Two, they're cheap and I don't cry if they die in job lots while I'm leveling myself and my Companions, so long as we don't all get killed. This is pretty callous, but hey, they're scum-dog mercenaries who'd be burning somebody's barn down if they weren't cutting throats for me, so I don't feel too bad. And some of these guys are eventually going to become fairly valuable, as they level.
Basically, though, I go for missile troops immediately. This allows me and my Companions to act as cavalry and support, while my troops maintain a line and hopefully aren't killed.
Here is my Mercenary Archer character, entering Early Game:
Early Game
Now it's time to enter the early game. There are lots of valid choices here. For example, if you talk to the Guild Master, he'll probably have work for you to do that will pay a reasonable fee, and if you fight and win a battle along the way, even better.
But I usually don't bother. Usually, I go find some more of the weak parties of Looters and take them out. Again, remember- they'll get killed by Lords, Manhunters and Caravans. They're a diminishing resource, so you may as well harvest the ones you can find, before they're gone.
As you kill off these parties, assuming that you don't lose these battles (which you should not) and gain around 10 levels or so, you'll want to begin to get serious about your long-term build.
Archers are a flexible class, build-wise, but in the late game, you're going to want to put as much as possible into both INT and CHR party-based skills, especially Pathfinding, Defensive Tactics and Heroism. The last two are very important combat skills- they make your troops take less damage, while dealing more in return. This makes a very large difference in the relative power of armies, as you get into the later game. However, during this early phase, you need to buy enough points in STR to wear armor that will give you a chance to survive hits from gunpowder weapons. I'd suggest aiming for 14-15 STR early on.
Your next major choice is whether to serve as a mercenary for the Lords, or even become a Vassal. This is a risky choice, as you will most likely want to strike out on your own later on, but it can pay off early by allowing you to get free support in battles and some good loot. Usually I remain independent with this class, so that the penalties for starting my own empire later are as low as possible, but I help Lords out whenever possible, to raise my Relationships with them.
You want to wander around, picking up as many Companions as possible, as early as possible. Developed early, your Companions can make your core army extremely powerful by late game, and bring many valuable skills with them. Leveling Companions is usually pretty easy; I suggest giving them missile weapons and only mounting the ones that have stats that make them effective hand-to-hand fighters from the start. You can turn even the weakest Companions into fairly formidable warriors over time, but some are best kept as support troops, out of the thick of the fighting, and I never use any of them as line infantry- due to the nature of combat in this mod, you will find that even the best Companions are weaker in that role than the higher-quality mercenaries and powerful Faction troops. But using Companions means that you don't need any cavalry during early game, and you'll find that they gradually improve the quality of your army a lot. So picking them up early is a must.
Early on, don't pick fights with any of the bandits that aren't Looters or Scum. The other bandit groups tend to have a lot of cavalry, and can be exceedingly dangerous- or, in the case of the Sea Raiders, they are formidable infantry with strong archer support. You can't defeat these forces with early armies without taking large losses, and the Archer can't afford to put a lot of points into Surgery, either. Picking up Jeremus to help in that regard is very useful, but won't entirely keep you from eating up your finances. But after 5-6 fights, you'll have saved up enough money to start buying fairly decent troops in large enough numbers to be effective against most early threats.
My character, at the end of Early Game:
Middle Game
During middle game, you've arrived at the point where you and your core band are finally becoming competent. If you've put enough points into Heroism and Defensive Tactics, you will start to see lower and lower casualties during battles with ordinary bandits. It's time to broaden your scope and decide on your objectives for late game.
The classic way to play this mod out, at this point, is to either become a Vassal and help lead one of the Factions to total victory (boo, hiss), or to build towards becoming Emperor (yay). This is the major fork in that road.
At this point, you should be around level 20 or so. You have decent equipment; your Companions are no longer wearing cast-off armor, and your army is full of Elite troops, maybe a few Experts. Depending on how much you've used Faction troops, you may have some very powerful support troops in your army, like Sarranid Snipers, Khergit Rocketeers, or Swadian Handgonners. You probably have some nice infantry formations and a small amount of excellent cavalry. You are, in short, ready to take castles over, maybe even cities. Except for one problem; money.
While your personal finances are probably very good at this point, and you'll routinely have a balance of greater than 50K or higher, you need to get a secure source of income built to deal with the special problems of late-game play. By this point in the game, you're also nearing the point where the Death Knights show up, if you're playing on Mommy, and that adds to the problems.
Empires are expensive, but they can be made to pay for themselves, within reasonable limits. The key here is that you need to get a steady source of income going that will pay the ongoing expenses and keep you afloat through hard times, such as having to rebuild your army after a brutal battle with Faction troops or the Death Knights.
The best way to do this is to Invest it. Go to each city and speak to the Guild Master about this. Iron foundries and dye works offer the most reliable and highest payouts (as of 1.19- this will get reviewed and probably changed in 1.20, as it got left on the cutting-room floor for this version). While the payoff is long-term, it's worth buying as soon as you can afford to do it, because the long-term effects on your finances will be worth it. Between Investments and income from fiefs, your defensive forces can pretty much pay for themselves. That leaves you with just the expenses of maintaining your own army, which should remain manageable. You don't have to do this; pay from selling captives (the primary source of income in the mod) may sustain all of your costs indefinitely, if you don't lose any battles. If you're the type of player who saves before and after every fight, and re-fights any where you lose, then it's probably safe to play that way.
As you gather up the Investments, you can evaluate what's going on in the game's world around you, and, if you're going to form an empire, look for weakness in the kingdoms. By mid-game, one or more of the Factions will be in serious trouble, and will have lost several castles, or even a city. These are ideal targets, because they'll have fewer active Lords to defeat and they're probably preoccupied with fighting the other Faction or Factions.
In terms of stats, by mid-game you are probably done putting points into STR, and may not want to put further points into AGI, but buying more Reflexes is always a useful buff to have, since it can literally be a life-saver. Mainly, though, you want to put points into INT and CHR, and build up your army-support skills as much as possible, while putting a few points into ancillary skills. You want to have a Riding skill of 4 or better, for example, so that you can ride an armored horse- fighting Faction troops without one is impractical.
Late Game
At this point, the Archer should, ideally, have reached level 25-30. You should now have Companions who give you bonuses in Defensive Tactics and Heroism of at least 3 if not better, giving you a combined score of at least 9 if not higher. This is vital for your class, if you want to face the Faction armies and survive, let alone defeat the Death Knights.
At this point, you've pretty much finished the leveling treadmill, and should have an army of 250+ troops, most of whom are Elite or better, and costing up to 40,000 dinars per week, although it's usually less than that. You are ready to take on anything. Pick a weak spot in one of the Factions' holdings, and begin to take over Calradia.
Should you make your Companions Lords, when playing this class? Yes, with some qualifications. Usually, you'll want to retain at least 3-4 Companions who buff important skills you need, like Pathfinding, Surgery, Defensive Tactics, Heroism, Looting, Trainer and so forth. By this point in the game, if you've managed your Companions well, you will be spoilt for choice, in terms of who to make a Lord, but if not, you may want to level them further. Also bear in mind that each Companion fields different armies, and some are better than others in the role of a Lord. These are things you'll have to figure out as you play.
Should you keep your Lords with you a lot, or let them defend your territory? With this class, if you've played it correctly, you usually don't need a great deal of support- one or two Lords will provide you with plenty of troops, should you need massive numbers. Ideally, you want to face the Factions with around 1000 troops or more, so that you can fight them on terms that, when army skills and your tactical acumen are included, are something like even odds. But you can and will defeat Lord armies vastly larger than yours with a core force of 400 or so- it really depends on what your army composition looks like and the power of the enemy troops. Against some of the Factions, in particular the Vaegir and the Rhodoks, it's difficult to defeat them without building an army specifically geared to nullify their advantages, so keep that in mind.
Should you fight defensive battles to keep castles and cities? In general, no. This class can do a very fine job during castle defense, but the numbers you'll face on Mommy make it unlikely to succeed. It's usually better to stay on the offensive and force the enemy to besiege all the castles you've taken, while taking castles at a minimal cost with specialists and picking off small Lord forces whenever you can.
****************************************************************
I hope this guide is useful to people playing this class, and improves your understanding of the mod