


WilliamBerne
Master Knight

I made this map specifically for clan training. In case you don't understand how to use it, I explain it here.
This map should be run with TDM mode, that way the dead player respawns faster.
Although the finished map looks a little different from the WIP one, but the training sections are the same. So I also put it here.
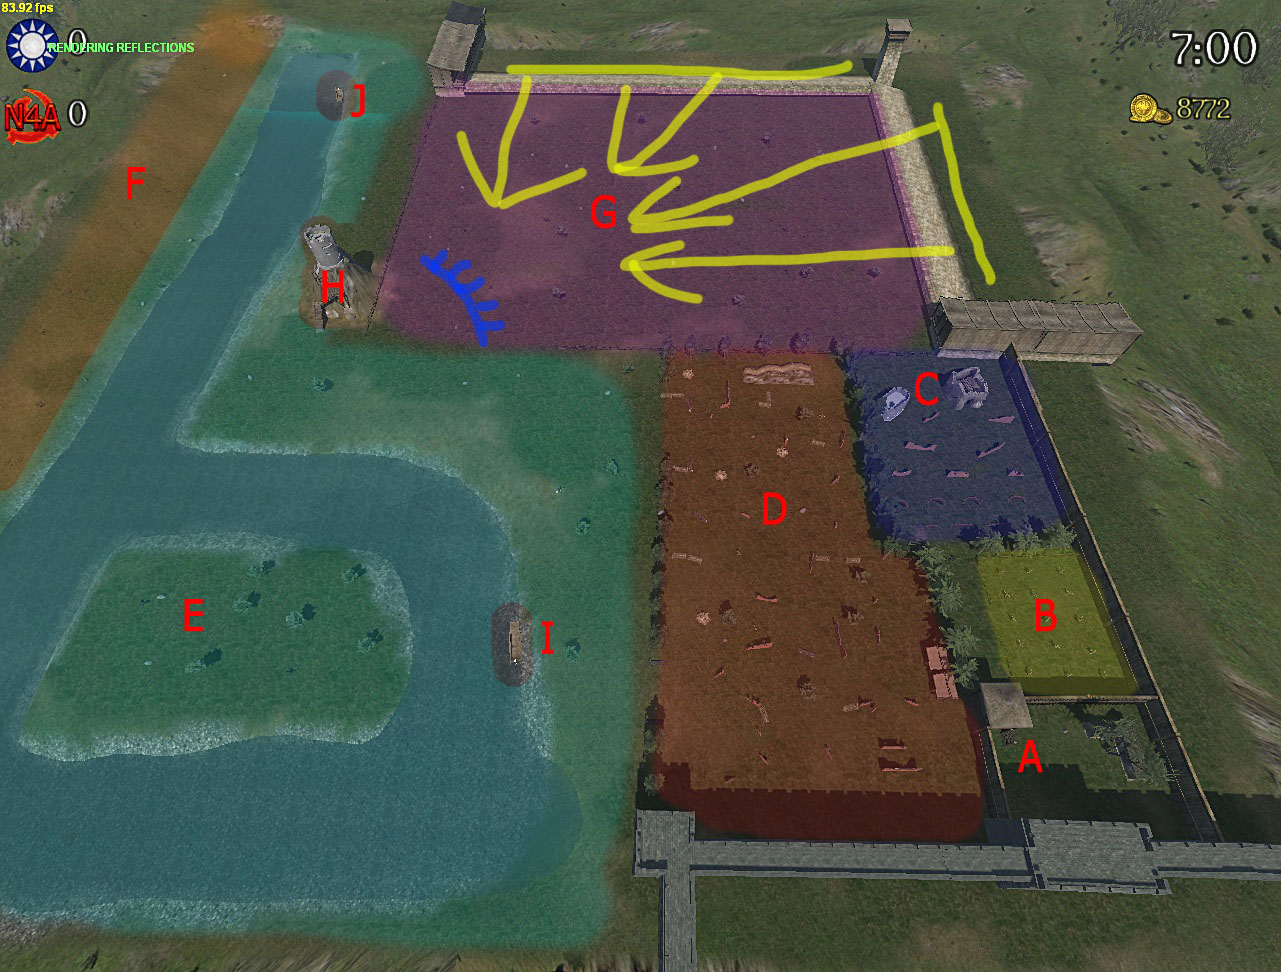
A: Spawn points.
B: Melee section, dummies.
C: Grenadier section, destroyed buildings.
D: Horseman section, obstacles and dummies.
E: Boat and island section.
F: Mortar targets section.
G: Actual combat section, AI troops attack from yellow area, students defend blue area.
H: Very high coach bunker, coach can customize the attacking AI's faction, class and waves.
J & I: 2 boats.
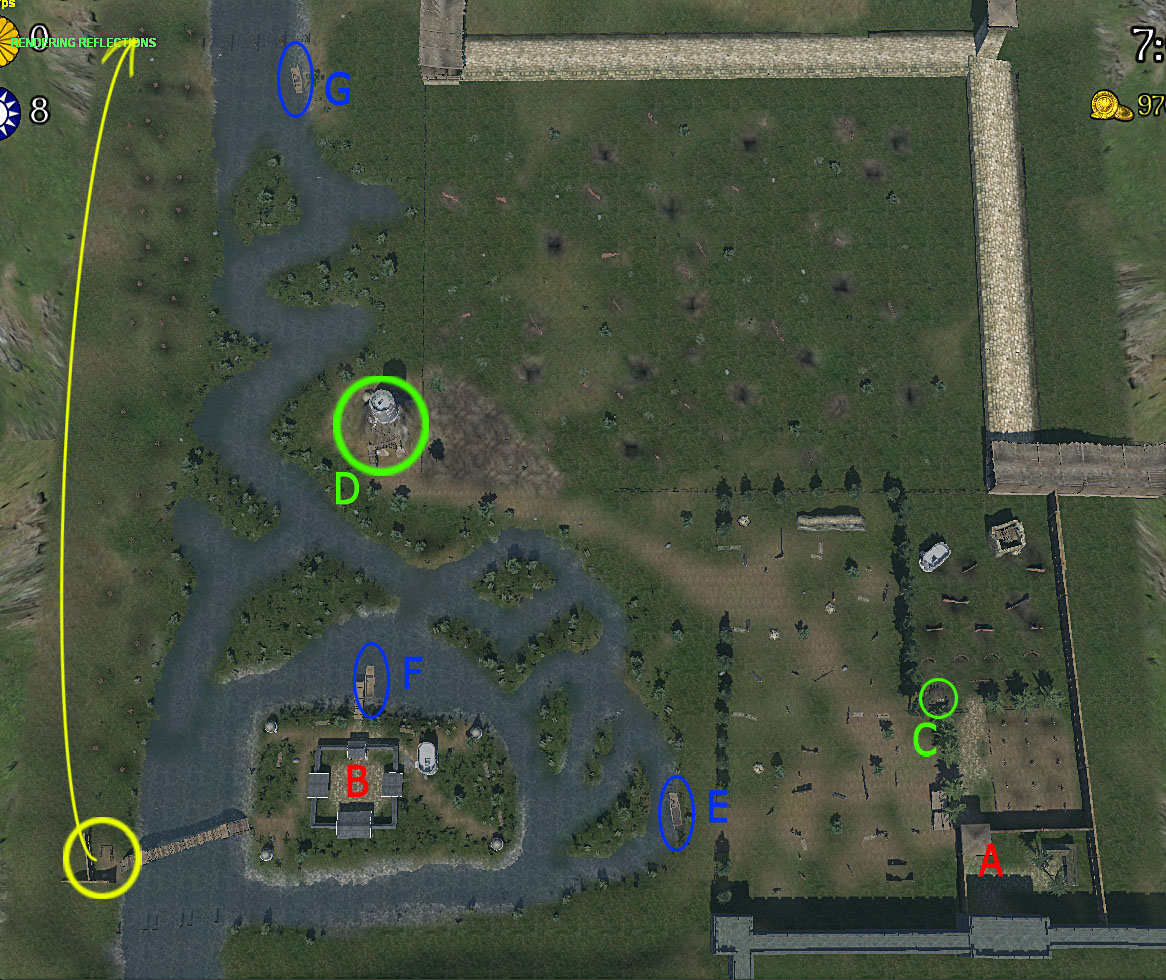
A: Team 1 spawn point, close to melee, grenade and horse drilling sections.
B: Team 2 spawn point, close to mortar, boat and actual combat sections.
C, D: Drillmaster bunker/tower, controls AI troops, students' ammo and HP from there.
E, F, G: 3 boats.
Yellow lines: Mortar firing range.
If you want to train melee, grenade and horse, select team 1, if you want to train mortar, boats, and see how your troops perform in a real combat, choose team 2. I'm not saying that you can't choose team 1 and train mortar or boats. The way I recommended is just a little shorter.
For grenade training, let your students all take at least 1 set grenade, and line up behind the sandbag walls in section C, the coach(or drillmaster, or clan leader what ever you say) climbs up to tower C. There are 3 boxes(options) on the tower, the coach can add AI targets, heal all the students or refill everyone's ammo anytime.
The actual combat section(Section G) is good for training against massive infantry and cavalries, the coach can also observe the students' performance at that area and promote the students accordingly.
The students should stay at the entrance of the section, build up fortification when allowed, and shoot the incoming training bots. Students are not allowed to go into the high bunker, it is only for the coach.
The coach will see a box at the entrance of the high bunker, which could switch the coach's team to team 3, so the training AI won't consider him as an enemy. Use the box again, he will switch back to his original team. At the top of the bunker, there are 5 boxes. With them, the coach can choose infantries and cavalries from all 8 factions, and of course restore students ammo and HP.
The bunker top is pretty safe, you can also jump onto the wall and walk freely, never fear falling down to the ground.
If anything you don't understand, or you want some function but it is not in the map, reply here.
Hope this map would be helpful to you, cause the clan battle is coming!
This map should be run with TDM mode, that way the dead player respawns faster.
Although the finished map looks a little different from the WIP one, but the training sections are the same. So I also put it here.
A: Spawn points.
B: Melee section, dummies.
C: Grenadier section, destroyed buildings.
D: Horseman section, obstacles and dummies.
E: Boat and island section.
F: Mortar targets section.
G: Actual combat section, AI troops attack from yellow area, students defend blue area.
H: Very high coach bunker, coach can customize the attacking AI's faction, class and waves.
J & I: 2 boats.
A: Team 1 spawn point, close to melee, grenade and horse drilling sections.
B: Team 2 spawn point, close to mortar, boat and actual combat sections.
C, D: Drillmaster bunker/tower, controls AI troops, students' ammo and HP from there.
E, F, G: 3 boats.
Yellow lines: Mortar firing range.
If you want to train melee, grenade and horse, select team 1, if you want to train mortar, boats, and see how your troops perform in a real combat, choose team 2. I'm not saying that you can't choose team 1 and train mortar or boats. The way I recommended is just a little shorter.
For grenade training, let your students all take at least 1 set grenade, and line up behind the sandbag walls in section C, the coach(or drillmaster, or clan leader what ever you say) climbs up to tower C. There are 3 boxes(options) on the tower, the coach can add AI targets, heal all the students or refill everyone's ammo anytime.
The actual combat section(Section G) is good for training against massive infantry and cavalries, the coach can also observe the students' performance at that area and promote the students accordingly.
The students should stay at the entrance of the section, build up fortification when allowed, and shoot the incoming training bots. Students are not allowed to go into the high bunker, it is only for the coach.
The coach will see a box at the entrance of the high bunker, which could switch the coach's team to team 3, so the training AI won't consider him as an enemy. Use the box again, he will switch back to his original team. At the top of the bunker, there are 5 boxes. With them, the coach can choose infantries and cavalries from all 8 factions, and of course restore students ammo and HP.
The bunker top is pretty safe, you can also jump onto the wall and walk freely, never fear falling down to the ground.
If anything you don't understand, or you want some function but it is not in the map, reply here.
Hope this map would be helpful to you, cause the clan battle is coming!